Policy Templates
Policy templates in the Calibo Accelerate platform serve as a powerful governance tool, enabling you to standardize the tools, technologies, and processes your teams use in digital and data product development. By enforcing a policy template on a product or portfolio in the Calibo Accelerate platform, you can make only standardized tools, technologies, and deployment workflow available to teams, and thus, ensure adherence to organizational policies, prevent addition of unwanted tools to your tech stack, and enhance security and compliance standards.
Also read Policy Templates: Frequently Asked Questions (FAQs).
Contents
Creating a policy template
A Tenant Administrator or a Configuration Administrator can create and manage policy templates in the Calibo Accelerate platform. You can also create a custom role to manage policy templates. See Creating Custom Roles.
To create a policy template, follow these steps:
-
Go to Configuration > Platform Setup > Standards > Policy Templates > + New Policy Template.
-
Template Name
Provide a unique name for the policy template. This name will appear in a dropdown list for selection at the product or portfolio level. -
Description
Provide a description for your policy template. Description helps you identify the correct template especially when you create multiple templates. -
The following table contains configuration steps for setting up policy templates across various tabs for each area of the Calibo Accelerate platform.

Note:
The connection configurations of various tools saved and the technologies selected on the Cloud Platforms, Tools, and Technologies screen are available for selection on various tabs while defining a policy template.

Note:
If you do not enforce a policy template at the product or portfolio level, default connection configurations of tools are used across the Define, Design, Develop, and Deploy phases of product development. However, when you enforce a policy template, configurations selected in the template supersede the default configurations.
Area Tab Configuration Steps General Assessment Categories Choose categories to include in the team maturity assessment questionnaire. Enable toggles for the categories you want to include. Collaboration Tools Enable the Use Collaboration Tool toggle to allow teams to use collaboration tools like Microsoft Teams. Features Set the maximum number of features that can be created within a product in the Calibo Accelerate platform. Once this limit is reached, users cannot create new features in the product on which you enforce the policy template.
This helps manage scope and ensures projects stay focused and manageable. It prevents feature overload, helping in better project planning and resource allocation.
Define Turn on the Use Agile Management Tool for Ideas or Business Requirements option and then select the agile planning tool configuration to be used for project execution and management. You can select one configuration per template. Design Document Management Tools Turn on the Use document management tool for design artifacts option and then select the document management tool configuration to be used for document management and knowledge sharing for a product. You can select one configuration per template. Develop Source Code Management In this section, you can standardize the source code repository tool to be used for each technology added to a product in the Calibo Accelerate platform. You can select one source code repository tool per template.
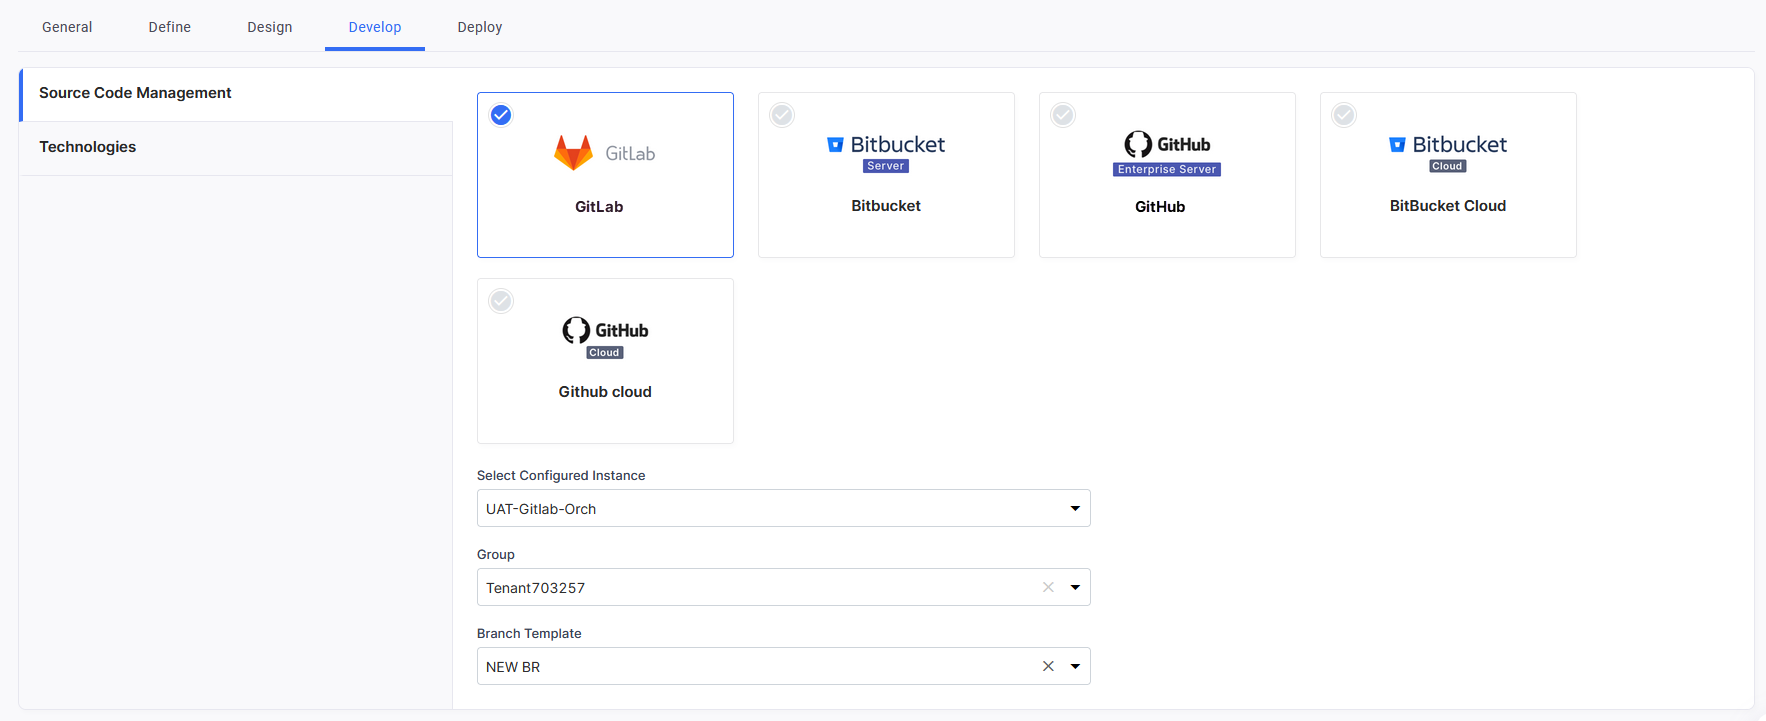
Here are the available options and the configuration details required for each:
 GitLab
- Select Configured Instance: Select from the list of your configured GitLab instances.
-
Group: The groups within the selected instance are fetched and are available for selection in a list. Select your desired group. Repositories are created under the specified GitLab group when developers add technologies in the Develop phase.
-
Branch Template: Select a branch template that aligns with your team's branching strategy.
 Bitbucket Server
-
Select Configured Instance: Select from the list of your configured Bitbucket Server instances.
-
Branch Template: Choose a branch template that aligns with your branching strategy.
 GitHub Enterprise Server
-
Select Configured Instance: Select from the list of your configured GitHub Enterprise Server instances.
-
Organization: Choose the organization within the selected GitHub Enterprise Server instance.
-
Branch Template: Select a branch template that aligns with your branching strategy.
 Bitbucket Cloud
-
Select Configured Instance: Select from the list of pre-configured Bitbucket Cloud instances.
-
Branch Template: Choose a branch template that aligns with your branching strategy.
 GitHub Cloud
-
Select Configured Instance: Select from the list of your configured GitHub Cloud instances.
-
Organization: Choose the organization within the selected GitHub Cloud instance.
-
Branch Template: Select a branch template that aligns with your branching strategy.
Technologies Specify which back-end, front-end, and data technologies should be allowed for use within a product. These technologies will be visible to developers in the Develop phase.
You can search for a specific technology by its name. Additionally, you can use the dropdown filter to narrow down your search.
Deploy Deployment Mode Select which deployment modes should be available at the stage level of the deployment workflow. Depending on your requirements, you can choose from the following options:
-
Docker
-
Kubernetes
-
OpenShift
-
Terraform
Cloud Platform Accounts Select the cloud service provider accounts that you want to make available for your team. When configuring or editing a deployment stage in the deployment flow, users can choose from the accounts you select here. Kubernetes Cluster Configurations Specify Kubernetes cluster configurations that you want to make available for your team. When configuring or editing a stage in the deployment flow, users can choose from the Kubernetes cluster instances you select here. OpenShift Configurations Specify OpenShift configurations that you want to make available for your team. When configuring or editing a stage in the deployment flow, users can choose from the OpenShift cluster instances you select here. Terraform Configurations Specify Terraform configurations that you want to make available for your team. When configuring or editing a stage in the deployment flow, users can choose from the Terraform configurations you select here. Machine Configuration Options 
Note:
To view the machine configuration options on this tab, make sure you have selected the Docker deployment mode earlier.
Enable the predefined cloud instance configuration options based on your application's needs and performance requirements. They vary in terms of their memory (RAM) and the number of virtual Central Processing Units (vCPUs). The options you enable here are available to developers when they add cloud instances for Docker deployments in a deployment stage.
The following configurations are available.
-
Large - 8 GB RAM 2 vCPU
-
Medium - 4 GB RAM 2 vCPU
-
Small - 2GB RAM 2 vCPU
-
Custom- 64GB RAM 16vCPU
For each enabled configuration option, you can set the maximum number of instances that can be provisioned across the product. By setting this maximum limit, you can control and manage infrastructure costs more effectively. This prevents users from unintentionally provisioning excessive instances, which could lead to unexpected expenses.
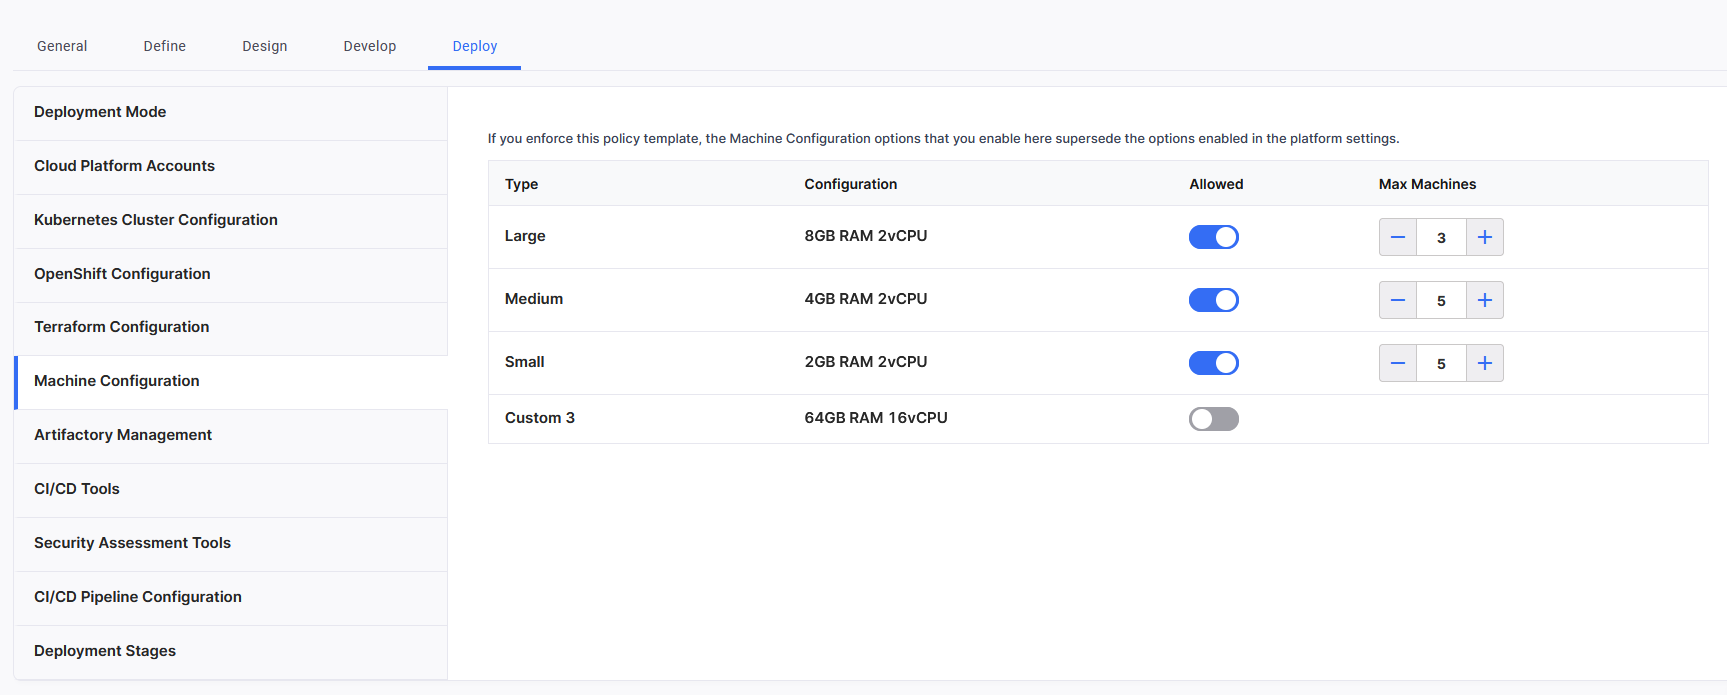
When you enforce this policy template to a product, the machine configuration options that you enable here supersede the options enabled in the global settings.
Artifact Management Tools Select the artifact management tools to be used for storing, deploying, sharing, and managing binaries and artifacts generated during your software development life cycle and their metadata. Select from the following options:
-
Amazon ECR
-
JFrog Artifactory
-
Azure ACR
The configured instances of these tools are available for selection in the list. Select your desired instances. You can select multiple instances of a tool as per your requirements.
When configuring or editing a stage in the deployment flow, users can choose from the artifact management tool instances you select here.
Selecting Allowed Repositories for Artifact Publishing in Artifactory
For JFrog Artifactory, after you select a saved Artifactory configuration, enable the Select repositories to publish artifacts toggle. Then click Select Repositories to open the side panel.

In the Select Artifact Repositories for Publishing drawer, choose the appropriate Artifactory instance, repository type (Maven, Gradle, or NPM), and select the local and/or release repositories from the available list. Click Add to confirm your selection.
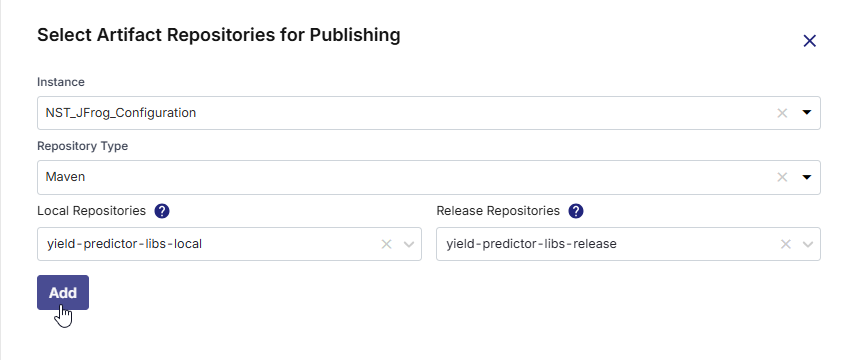
This setup allows administrators to restrict repository access and ensure that teams publish only to the designated repositories, maintaining control over artifact distribution.
CI/CD Tools Select which Jenkins instances should be available to users to automate continuous building, testing, and deployment of apps. When configuring or editing a stage in the deployment flow, users can choose from the Jenkins instances you select here. Security Assessment Tools Select which container security and code quality assessment tool instances should be available to users. Select Sonar and Qualys. The configured instances of these tools are available for selection in the list. Select your desired instances. You can select one instance of a tool per template. CI/CD Pipeline Configuration On this tab, you can add or remove CI/CD pipeline steps for the deployable technologies added on the Develop tab.
Click the + icon to add a step to the pipeline. You can continue adding steps as needed to define your CI/CD process. After you add all the steps, to change the sequence of steps, you must first remove at least one optional step. This allows you to readd steps and adjust the sequence as required.
This allows you to customize the CI/CD workflow, ensuring that each technology follows the appropriate steps during deployment, from code integration to final deployment.
Deployment Stages Allow users to create stages in the Deployment workflow
Enable this option to allow modifications in stage configuration in the Deploy phase. If this option is disabled, users cannot add, edit, or delete stages in the Deploy phase.
Configuring a deployment stage
Begin with configuring the Dev stage. This is the default stage for feature development and initial testing.
To configure a deployment stage, do the following:
-
Click the ellipsis (...) and then click Edit.
-
In the stage configuration side drawer, you cannot change the type of the default Dev stage. However, you can change its name.
For all subsequent stages in the deployment flow, you can enter your desired stage name and select or enter the desired stage type (Demo, UAT, Prod, and so on).
After a stage (other than the default Dev stage) is created, you cannot modify its type. You can, however, change the stage name while editing that stage. -
Deployment Mode
Select the desired deployment modes from the dropdown list. The modes you selected earlier on the Deployment Mode tab are available for selection in this dropdown list. Docker
If you select the Docker deployment mode, you need to configure the following options.
Cloud Platform Account
Select the cloud platform account for deploying technologies on Docker containers. You have the flexibility to select multiple cloud accounts, allowing separate Docker deployments for different technologies across various accounts.Select Load Balancer Creation Type
In the context of Docker deployments, load balancers ensure efficient utilization of resources and maintain high availability by distributing requests across various containers. Choose whether you want to create a load balancer manually or let the Calibo Accelerate platform create one automatically.Select load balancer scheme type
For automatic load balancer, choose whether to create a private (internal) load balancer or public (internet-facing) load balancer.Tag Policy
This section allows you to manage tags applied to various cloud resources such as cloud instances, load balancers, and more that are created from within the deployment stage.-
Predefined Tags
Calibo Accelerate provides a set of predefined tags that are automatically applied to all resources. These tags are prefixed with the term "Lazsa" to distinguish them. The predefined tags include:
-
Portfolio: Identifies the portfolio to which the resource belongs.
-
Project: Specifies the project associated with the resource.
-
Release: Indicates the release version.
-
Feature: Marks the specific feature linked to the resource.
-
Stage: Denotes the deployment stage (e.g., Dev, QA, Prod).
-
Source: Identifies the source of the resource.
-
User: Tags the user responsible for the resource.
-
These predefined tags are applied by default and help in organizing and tracking resources effectively.
-
Custom Tags
You can also create your own custom tags to meet specific needs. Create tags in key-value pairs. Do not use "name" as a key to prevent conflicts.
Custom tags are mandatory if your organization enforces tag policies at the organization level. This means if your organization's tag policy requires certain tags to be used for all cloud resources, you must add these custom tags during the deployment stage configuration. Otherwise resource creation may fail.
Machine Configuration
The options that you enabled on the Machine Configuration tab are visible in this section. You can edit your preferences to allow or restrict instance creation at the stage level. Kubernetes
Kubernetes Cluster
The Kubernetes clusters you selected earlier on the Kubernetes Cluster Configuration tab are available for selection in this dropdown list. Select one or more cluster configurations as per your requirements.
 OpenShift
OpenShift Cluster
The OpenShift clusters you selected earlier on the OpenShift Configuration tab are available for selection in this dropdown list. Select one or more cluster configurations as per your requirements.
 Terraform
Terraform Configuration
The configurations you selected earlier on the Terraform Configuration tab are available for selection in this dropdown list. Select one or more Terraform configurations as per your requirements.
-
-
Select Continuous Integration Tool
Select the continuous integration tool instance from the dropdown list. The instances that you selected earlier on the CI/CD Tools tab are available here for selection. -
Artifact Management Tool Select the artifact management tool to be used within the stage. The instances you selected earlier on the Artifact Management Tooltab are available here for selection.
Artifactory Environment (Optional)
You see this option if you select JFrog Artifactory instance as the artifact management tool for your deployment stage and if, in the saved connection details of this instance, you have chosen to use a project for repository management.
In the Artifactory Environment list, select an environment (for example, development, staging, production) to which you want to associate the repositories in JFrog Artifactory. If you do not specify an environment, the repository will not be associated with any project.
To create a new custom environment in Artifactory from within the Calibo Accelerate platform, type the name of the environment. Custom environments are supported for JFrog Artifactory 7.53.1 or later versions.
-
Code Analysis Tool (Optional)
You see this option if, on the Security Assessment Tools tab, you have selected the code quality tool instance (Currently SonarQube is supported in this section). Select the code analysis tool to be used in the CI/CD pipeline for the deployment stage. -
Container Image Scanning Tool (Optional)
You see this option if on the Security Assessment Tools tab, you have selected the vulnerability management tool instance (Currently Qualys and JFrog Xray are supported in this section). Select the container image scanning tool to be used in the CI/CD pipeline for the deployment stage. -
Click Create to save your changes. The stage is created.
To add and configure the next deployment stage, click the
 icon, and then follow the steps 2 to 8 mentioned earlier. You can add as many deployment stages of various types (QA, demo, UAT, prod, and so on) as you require.
 - Save Draft or Publish Template
After you configure a policy template, you can save it as a draft and publish it later or publish it immediately. You can also manage access to a policy template, ensuring that only authorized users can view or modify it. A published template is visible to users who have been granted access by the template creator. -
All policy templates (both drafts and published) are listed on the Policy Templates tab. You can view the template details such as template name, user who created the template, date when it was created, the products in the Calibo Accelerate platform where the template has been enforced, and the Draft or Published status of the template.
In the search box, you can search for a policy template by its name.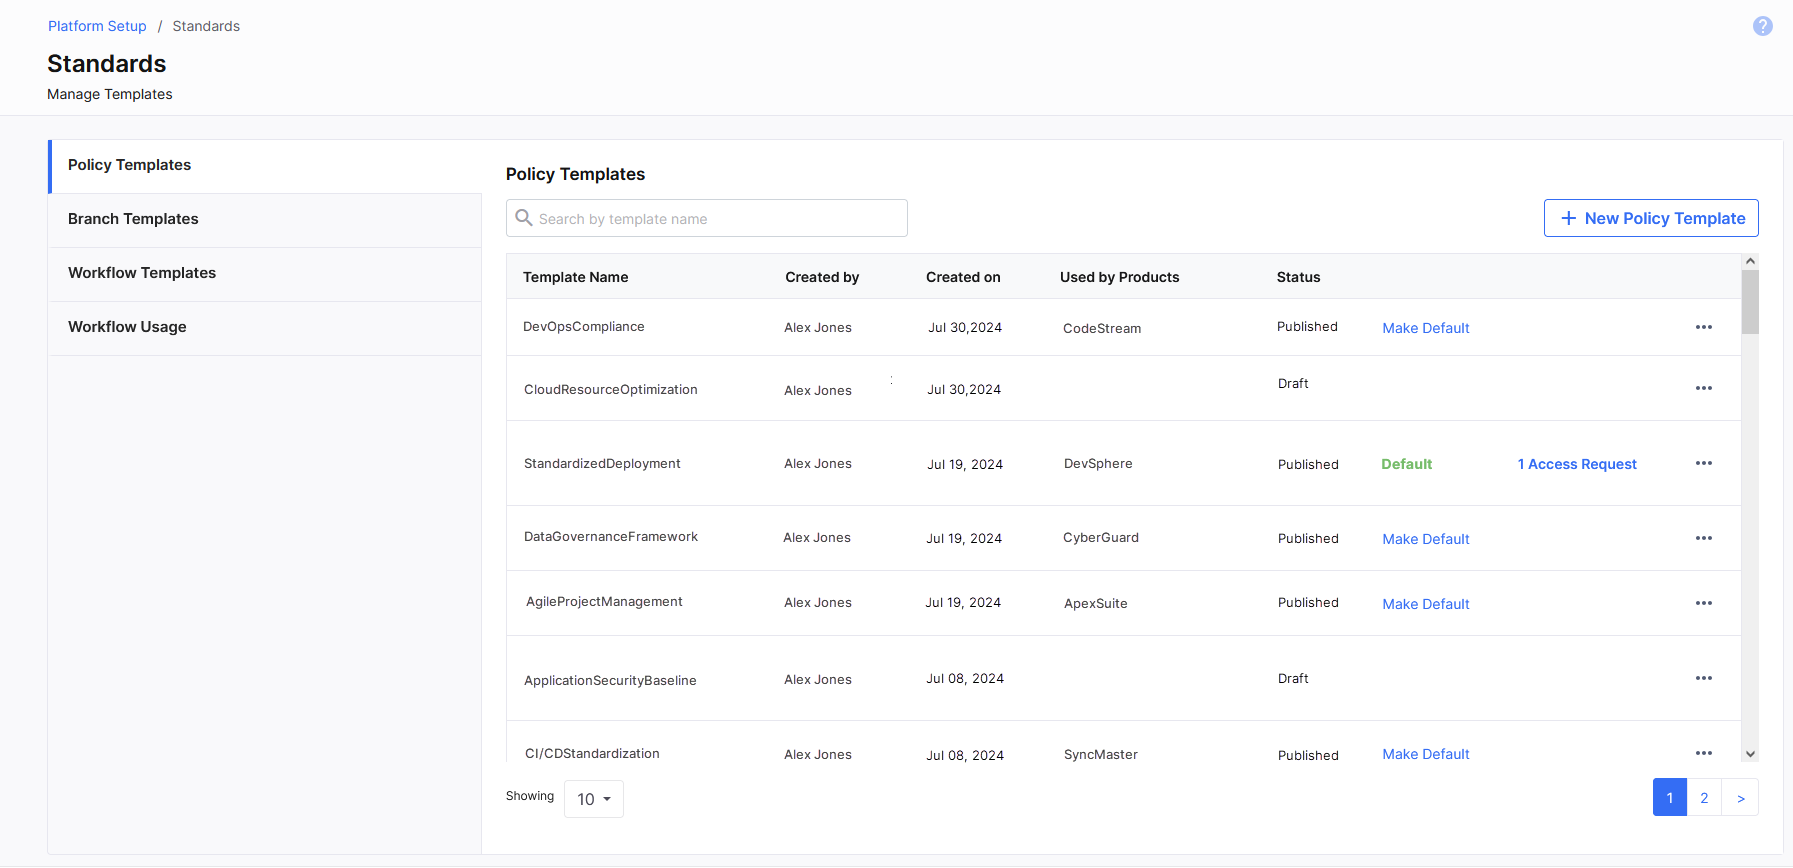
-
You can also make one policy template as the default template. The default template is available for enforcement to all users who have permissions to create or edit a product in the Calibo Accelerate platform. There is no need to request access to the default template. Otherwise, at the product level, a policy template is available for enforcement only to the template creator and to users having access to the template.
Managing access to a policy template
To control who can access and manage a policy template, follow these steps:
-
In the template details row, click the ellipsis (...) on the extreme right.
-
Select Manage Access from the dropdown menu.

-
In the Manage Access side drawer, do the following:
Tab Description Administrators If you are the template creator, your name will already be listed as an Administrator. You cannot remove yourself from this list. To facilitate collaborative management, you can add other administrators. Save your changes after you add desired users as administrators. This is useful when multiple users need to manage the template. Pending Requests If other users have requested access to your policy template, their requests will appear here. You can approve or reject these requests as necessary. Approved users will appear in the list of administrators.
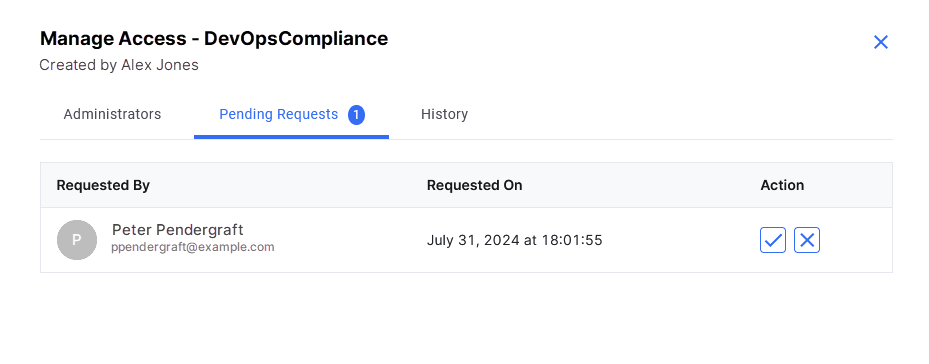
Whenever a user requests access to your policy template, you receive a notification. Click the bell icon in the left navigation pane to view the notification. Click the policy template name in the notification. The Pending Requests tab is displayed. You can approve or reject these requests as necessary.
History This tab displays the history of access requests, including approvals and rejections, providing transparency and accountability. By managing access effectively, you can ensure that only authorized users can manage policy templates. This access control helps you adhere to your organization's standards and governance policies.
Requesting access to a policy template
Tenant Administrators and Configuration Administrators have access to all policy templates in the Calibo Accelerate platform. However, depending on your role, you may not have access to policy templates created by other users. To request access to a policy template, follow these steps:
-
Go to Configuration > Platform Setup > Standards > Policy Templates.
-
In the row for the desired template, click the ellipsis (...) on the extreme right.
-
Select Request Access from the dropdown menu.

The administrator of the requested template will review and either approve or reject your request. Upon approval, you will gain access to the template.
Editing a policy template
Note:
Policy templates should be created strategically, with careful planning and consideration of the tools and technologies required. While editing a policy template is technically possible, frequent changes are not recommended. Such changes can disrupt workflows, create confusion for developers, and impact ongoing projects. It is best to thoughtfully plan and finalize the template before applying it to a product. Edit it only when absolutely necessary to maintain stability and consistency.
To edit a policy template, do the following:
-
In the template details row, click the ellipsis (...) on the extreme right.
-
Select Edit from the dropdown menu.
The policy template will open in edit mode, allowing you to make the necessary changes. The fields available for editing are the same as those in the Creating a policy template section. Refer to that section for a detailed description of each field.
Note:
You cannot edit a policy template if it is already enforced on a product or portfolio in the Calibo Accelerate platform. You must first dissociate the template from all the products and portfolios currently using that template and then proceed with editing the template.
Enforcing a policy template
You can enforce a policy template separately to each product or enforce a common policy template to the entire portfolio. If you enforce a policy template at the portfolio level, it is applied to all the products associated with the portfolio.
Note:
Before you enforce a policy template, ensure that in the Policy Templates section in General Settings, you have selected the desired option to associate a policy template at a product or portfolio level.
Enforcing a policy template on a product
A user with permissions to create or edit a product in the Calibo Accelerate platform can enforce a published policy template on a product. The user must have access to the template to apply it.
To enforce a policy template on a product, while creating or editing that product, on the Others tab, in the Policy Template (Optional) field, you see the following templates:
-
Default template (if a template is marked as default)
-
Templates you have created
-
Templates to which you have been added as an Administrator.
Select the desired policy template and save the product details.
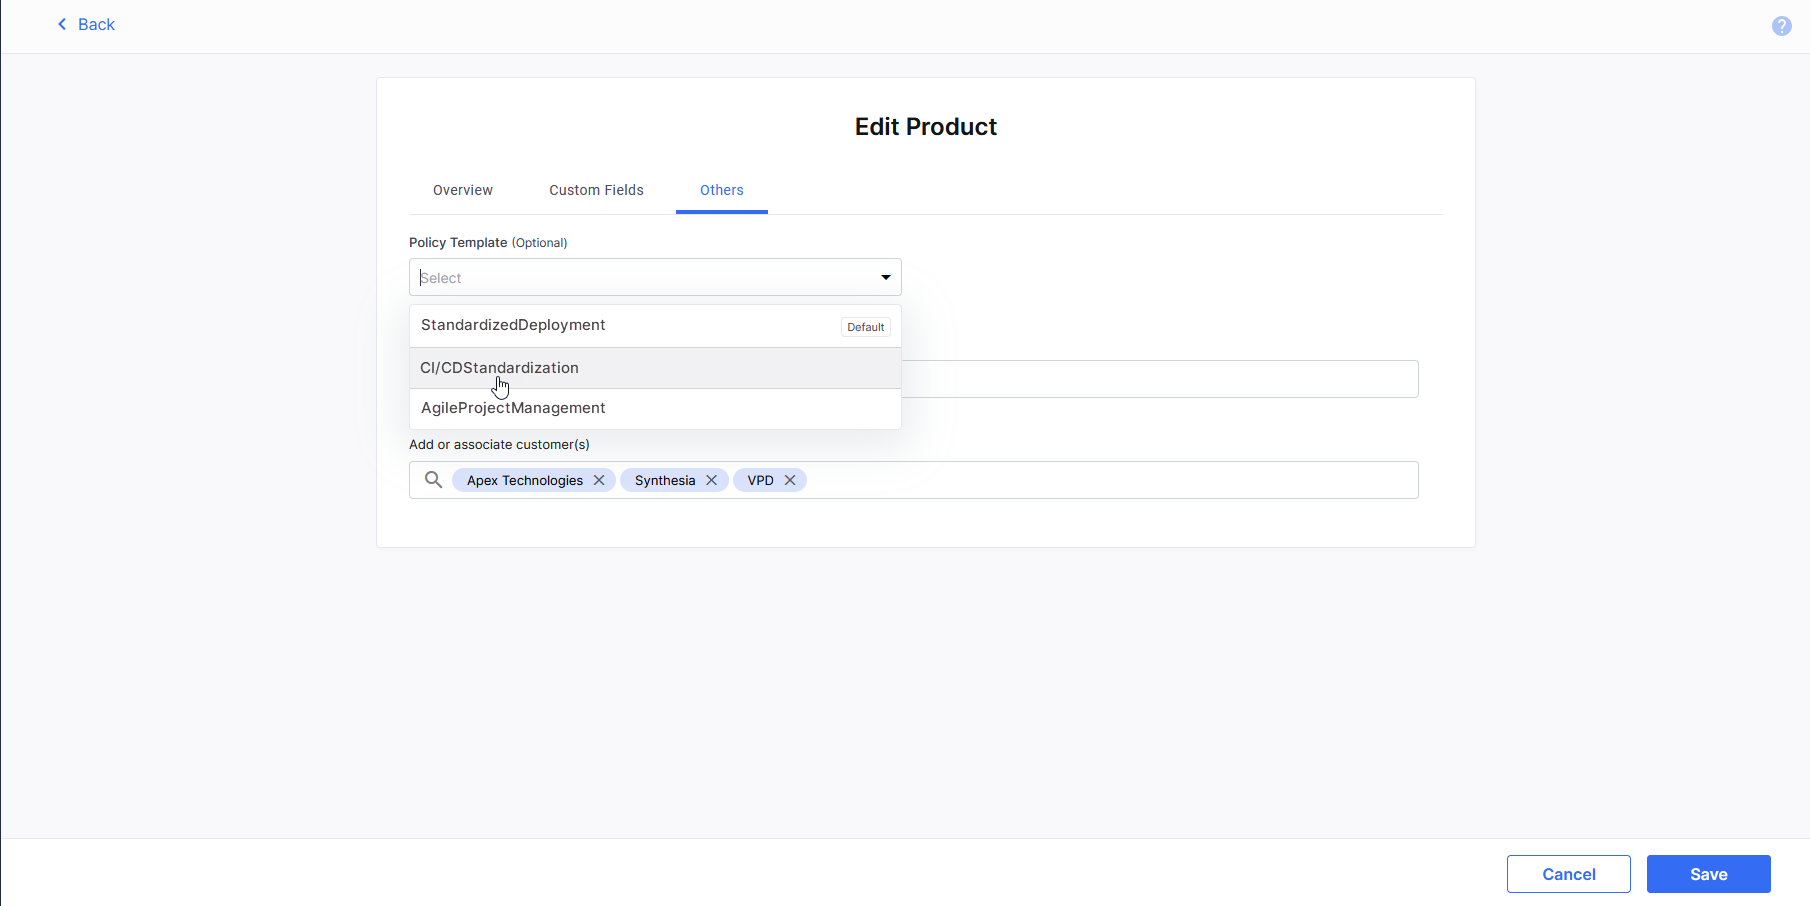
Note:
The Policy Template (Optional) field is disabled if your administrator has configured a global setting to apply a policy template at the portfolio level, or you do not have access to the policy template already assigned to the product. For any questions, please contact your administrator.
After a template is enforced, the tools, technologies, deployment modes, and deployment stages that are configured in the template are available to users and teams working on that product.
This serves as a guardrail for product teams, ensuring adherence to organizational policies and regulations.
Enforcing a policy template on a product portfolio
By enforcing a policy template on a product portfolio, you can ensure consistency in tools, technologies, and processes used across all products within that portfolio, maintaining a uniform standard.
A user with permissions to create or edit a product portfolio in the Calibo Accelerate platform can enforce a published policy template on a product portfolio. The user must have access to the template to apply it.
To enforce a policy template on a product portfolio, while creating or editing that portfolio, on the Overview tab, in the Policy Template (Optional) field, you see the following templates:
-
Default template (if a template is marked as default)
-
Templates you have created
-
Templates to which have been added as an Administrator.
Select the desired policy template and save the portfolio details.
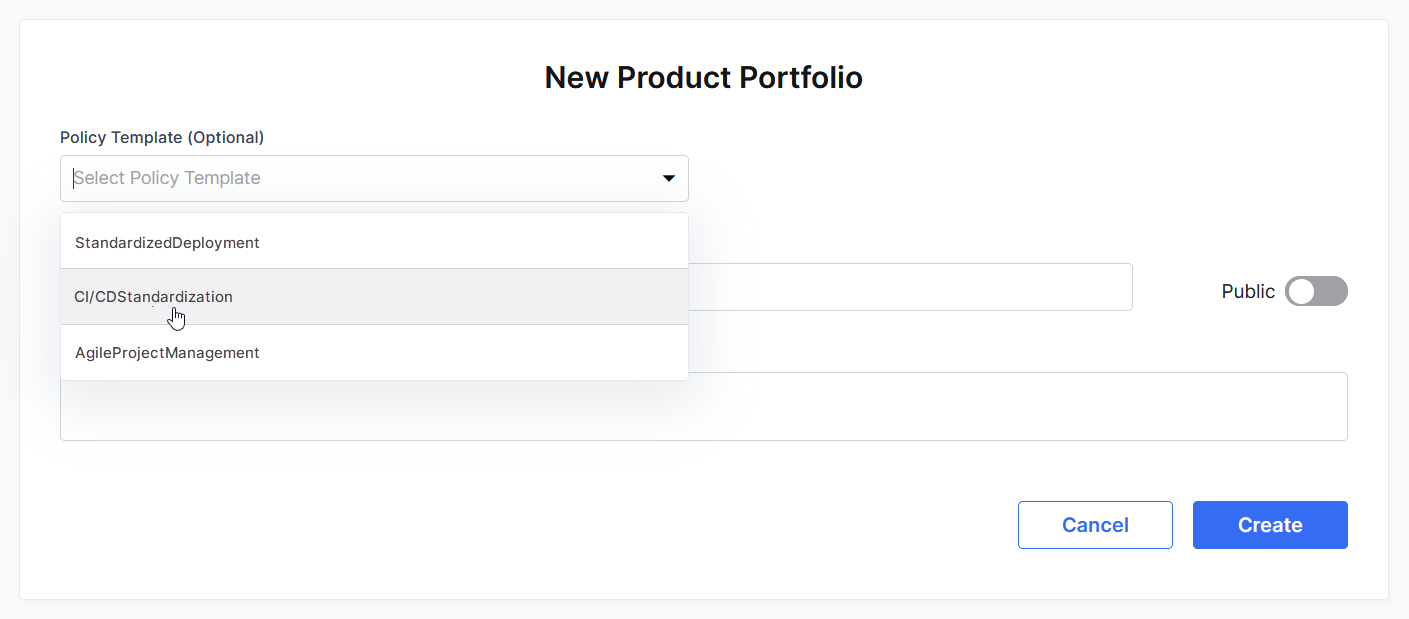
Note:
The Policy Template (Optional) field is disabled if your administrator has configured a global setting to apply a policy template at the product level, or you do not have access to the policy template already assigned to the portfolio. For any questions, please contact your administrator.
After a template is enforced, the tools, technologies, deployment modes, and deployment stages that are configured in the template are available to users and teams working on all the products associated with that portfolio.
This serves as a guardrail for product teams, ensuring adherence to organizational policies and regulations and standardization of tools and technologies across the organization.
Reviewing the usage details of a policy template
As the creator or administrator of a policy template, you can view which products and portfolios are using your policy template in the Calibo Accelerate platform. Follow these steps to review the usage details:
-
In the template details row, click the ellipsis (...) on the extreme right.
-
Select Usage Details from the dropdown menu.

-
On the Policy Template Usage Details screen. the list of products and portfolios is displayed on the respective tabs.

Note:
"Product" and "Product Portfolio" are the default terms displayed on the Calibo Accelerate platform interface. If you customize these terms, your preferred terminology will replace the default terms throughout the platform interface. For example, if you use "Offering" and "Product Line" instead of "Product" and "Product Portfolio," you will see the tabs labeled "Offerings" and "Product Lines." See Terminology Settings .
On the Products tab, view the list of all products where the template has been enforced. Use the search box to find a product by its name.On the Product Portfolios tab, view the list of all product portfolios where the template has been enforced. Use the search box to find a product portfolio by its name.
Deleting a policy template
To delete a policy template, do the following:
-
In the template details row, click the ellipsis (...) on the extreme right.
-
Select Delete from the dropdown menu.

Note:
You cannot delete a template currently in use by any product. To proceed, first dissociate the template from all associated products or portfolios.

Note:
Default templates cannot be deleted. To delete a default template, you must first mark another template as the default, review the usage details, and resolve any dependencies.
Also read Policy Templates: Frequently Asked Questions (FAQs).
| What's next? Branch Templates Settings |