Configure Connection Details of Agile Planning Tools
Agile planning tools enable you to manage agile product delivery at scale. These tools provide several features for backlog management, project planning and tracking, release management and roadmapping, and bug tracking, among others. These features boost adaptability, effective collaboration and communication and help you achieve early and continuous delivery of valuable software ensuring customer satisfaction.
Jira
Currently, the Calibo Accelerate platform supports Jira in the Agile Planning Tools category. For the Calibo Accelerate platform to pull data from Jira, you must provide the connection details of your active Jira subscription in the Calibo Accelerate platform. Before you provide the connection details, ensure that you have completed the following prerequisites:
Required Permissions
The following table contains the details of the user inputs required in the Calibo Accelerate platform and the permissions to process the inputs.
| User Input required in Calibo Accelerate | Required Permissions |
|---|---|
|
Site admins
|
Configuring Jira connection details
-
Sign in to the Calibo Accelerate platform and click Configuration in the left navigation pane.
- On the Platform Setup screen, on the Cloud Platform, Tools & Technologies tile, click Configure.
- On the Cloud Platform, Tools & Technologies screen, in the Agile Planning Tools section, click Configure.
(After you save connection details for at least one Jira subscription, you see the Modify button here.)

-
On the Agile Planning Tools screen, click the Jira tile to configure the connection details of your active Jira accounts.
- To save the connection properties of your Jira account, provide the following details:
Configuration Name: Give a local name to your configuration. Your Jira connection details are saved by this name in the Calibo Accelerate platform.
URL: Provide your Jira host URL. For example, https://testonly.atlassian.net.
Jira project creation required: If you enable this option, a new Jira project is created for a product or a portfolio depending on your preferences in Configuration > Settings > Agile Project Settings.
Depending on how you want your Jira credentials to be managed, do one of the following:
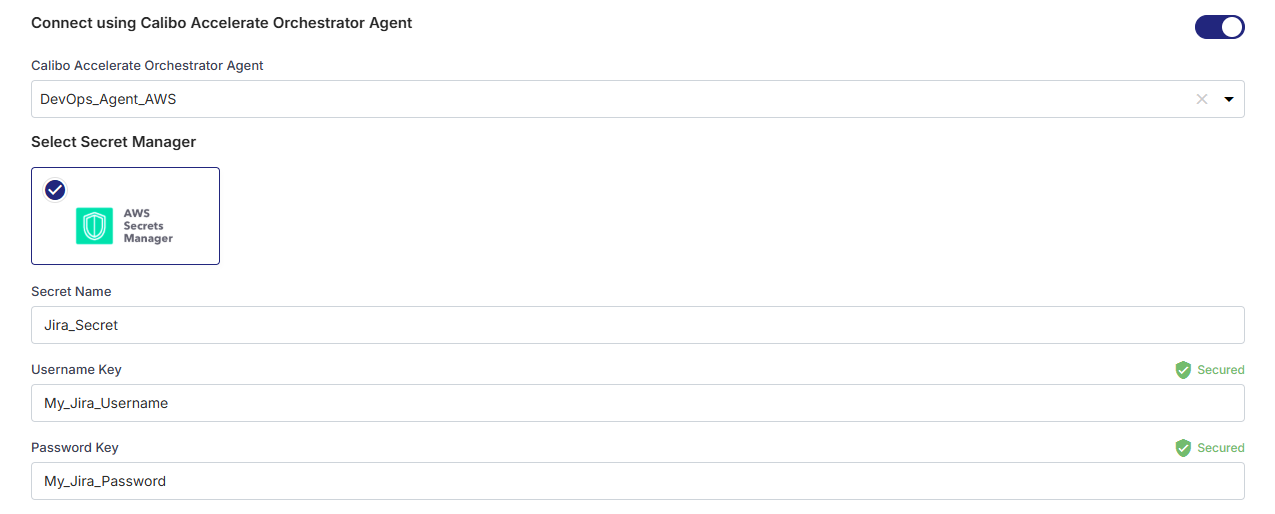
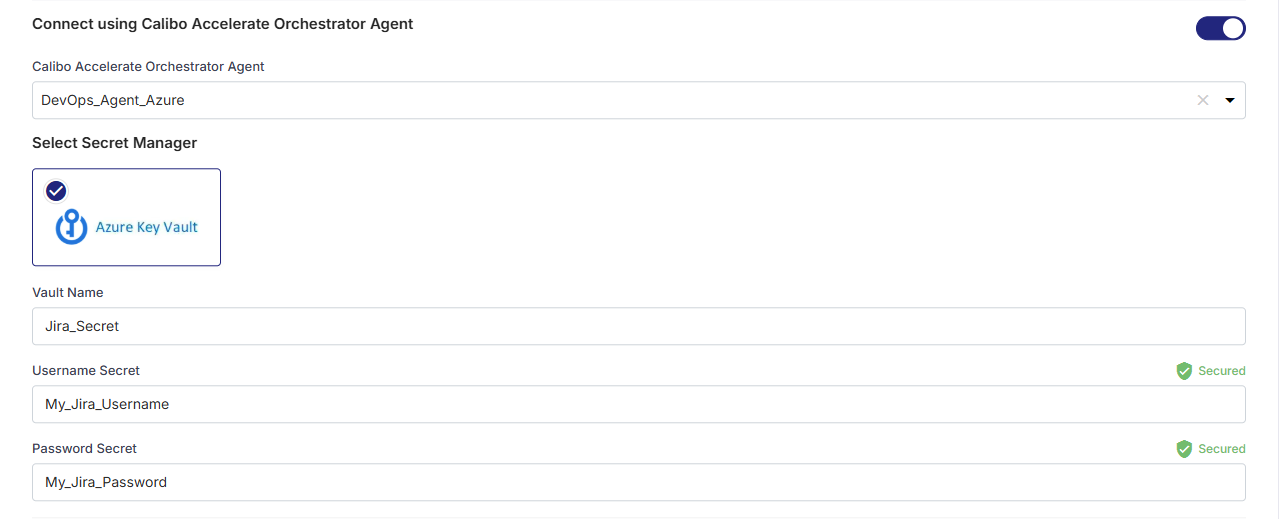
Connect using Calibo Accelerate Orchestrator Agent:
Turn on this toggle to use Calibo Accelerate Orchestrator Agent to programmatically resolve Jira credentials stored in your secrets management tool within your private network and to establish communication with your Jira instance.
In the Calibo Accelerate Orchestrator Agent dropdown list, all your configured agents are displayed. Select the one you want to use to connect to your Jira instance.
The secrets management tool that the selected Orchestrator Agent is authorized to access for retrieving secrets is auto-selected. Specify the details of Jira secrets that the agent should retrieve from the secrets management tool. Currently, we support AWS Secrets Manager and Azure Key Vault.
For AWS Secrets Manager, provide the secret name, username key, and API token key for your Jira account credentials.

For Azure Key Vault, provide the Vault Name, Username Secret, and API Token Secret for your Jira account credentials.

Select Secret Manager
If you don't use the Calibo Accelerate Orchestrator Agent, you can directly provide the credentials in the configuration, or retrieve them from a secrets management tool of your choice (such as AWS Secrets Manager or Azure Key Vault). Do one of the following:
Select Calibo Accelerate and type your Jira account username and API token. In this case, the user credentials are securely stored in the Calibo-managed secrets store.
Select AWS Secrets Manager. In the Secrets Management Tool dropdown list, the AWS Secrets Manager configurations that you save and activate in the Secret Management section on the Cloud Platform, Tools & Technologies screen are listed for selection. Select the configuration of your choice. Provide the Secret Name, Username Key, and the API Token Key for the Calibo Accelerate platform to retrieve the secrets for your Jira account.
Select Azure Key Vault. In the Vault Configuration dropdown list, the Azure Key Vault configurations that you save and activate in the Secret Management section on the Cloud Platform, Tools & Technologies screen are listed for selection. Select the configuration of your choice. Provide the Vault Name, Username Secret, and API Token Secret for the Calibo Accelerate platform to retrieve the credential values.
- Secure configuration details with a password
To password-protect your Jira account connection details, enable the Secure configuration details with a password option, enter a password, and then retype it to confirm.This is optional but recommended. When you share the connection details with multiple users, password protection helps you ensure authorized access to the connection details.
Test Connection
Click Test Connection to check if you can connect to the configured Jira account successfully.After you save and activate the configured connection details, you can see them listed on the Cloud Platform, Tools & Technologies screen.
That's it! You have configured the connection details of your agile planning tool account. Now, you may want to add other tools required to manage your product development life cycle.
|
What's next? Document Management Tools |