Create a Data Pipeline
You can use the Data Pipeline Studio to create a data pipeline within a few clicks and with minimal configuration.
Prerequisites:
Configure the required data engineering tools i.e. Databases, Data Integration, and Data Visualization tools from Cloud Platform Tools & Technologies of the Configuration workspace.
- Log on to the Calibo Accelerate platform and navigate to Products.
- Create a product, add a feature and add the required phases to it. Adding a release is optional.
- Click the Develop phase and click Data Pipeline Studio.
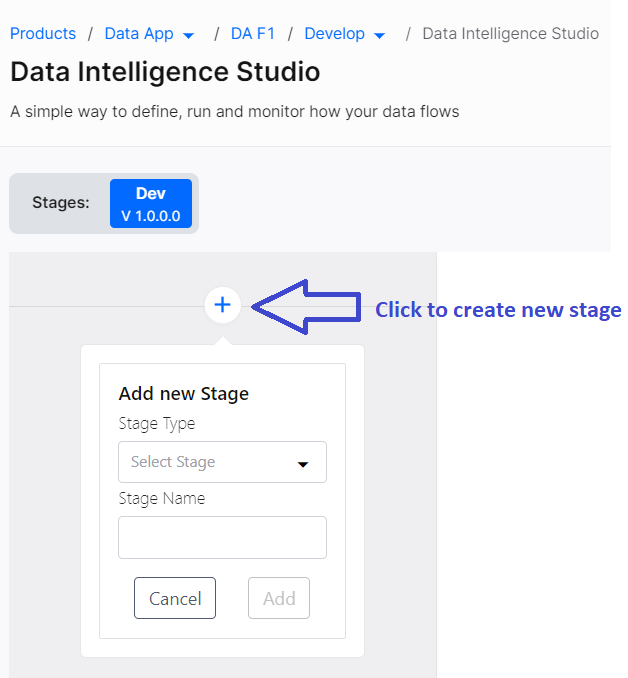
- On the left side of the screen, click + to add a new stage.

Under Add New Stage, select the Stage Type, provide the Stage Name and click Add.
On the newly added stage, click + to add one or more nodes to the stage and then add tech stacks to each node.
Click the node to configure it. See Configuration Requirements of Tech Stacks in DPS. You can provide the required configuration details and click Deploy. After a tech stack is configured, you see a green tick on the tech stack.
If the source and target nodes are configured and you are establishing a connection between the two through a Databricks node, which is not configured, you can complete the template creation.
- Right-click a node to delete it.
- Repeat step 5 to add the required stages and nodes in the data pipeline.
- Connect various nodes within a stage or across stages using connectors. There is explicit support for connecting nodes, depending on the tech stacks configured for each node. See Supported Technologies for Connecting Nodes in Data Pipeline Studio for more information. When you try to connect one node to another node, if the target node is supported, it displays a green outline and you are able to drop the connector on the target node. Click a node and drop the connector on the target node to create a connection. Right-click a connector to delete it. Right-click a node and click Delete to delete the node in the stage of a data pipeline.
- Click the ellipsis (...) on a stage and click Delete to delete the stage.
- Click Save to save the changes made to the data pipeline.
- After the tech stacks in all the stages of the data pipeline are configured and deployed, click the Arrow to run the data pipeline.
| What's next?your susRun and Monitor a Data Pipeline |