Designing a Global Workflow Template
As a Platform Administrator, you may want to create global workflow templates that can be utilized across the Calibo Accelerate platform. These workflows provide a structured approval mechanism, ensuring that key actions within product development are validated, authorized, and systematically documented.
By setting up workflow templates at the platform level, you can maintain uniformity, compliance, and efficiency in your organization's approval processes.
Contents
Steps to Design a Global Workflow Template
Follow these steps to design your global workflow templates and make them available for your teams.
-
Sign in to the Calibo Accelerate platform and then, from the left navigation pane, click Configuration.
-
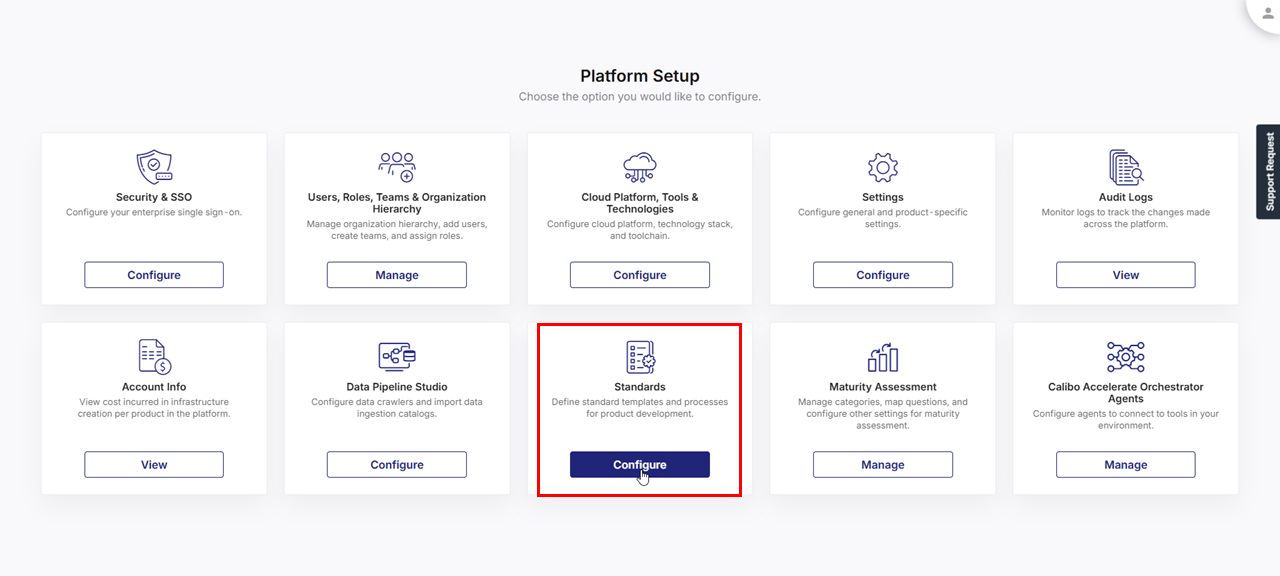
On the Platform Setup screen, on the Standards tile, click Configure.
-
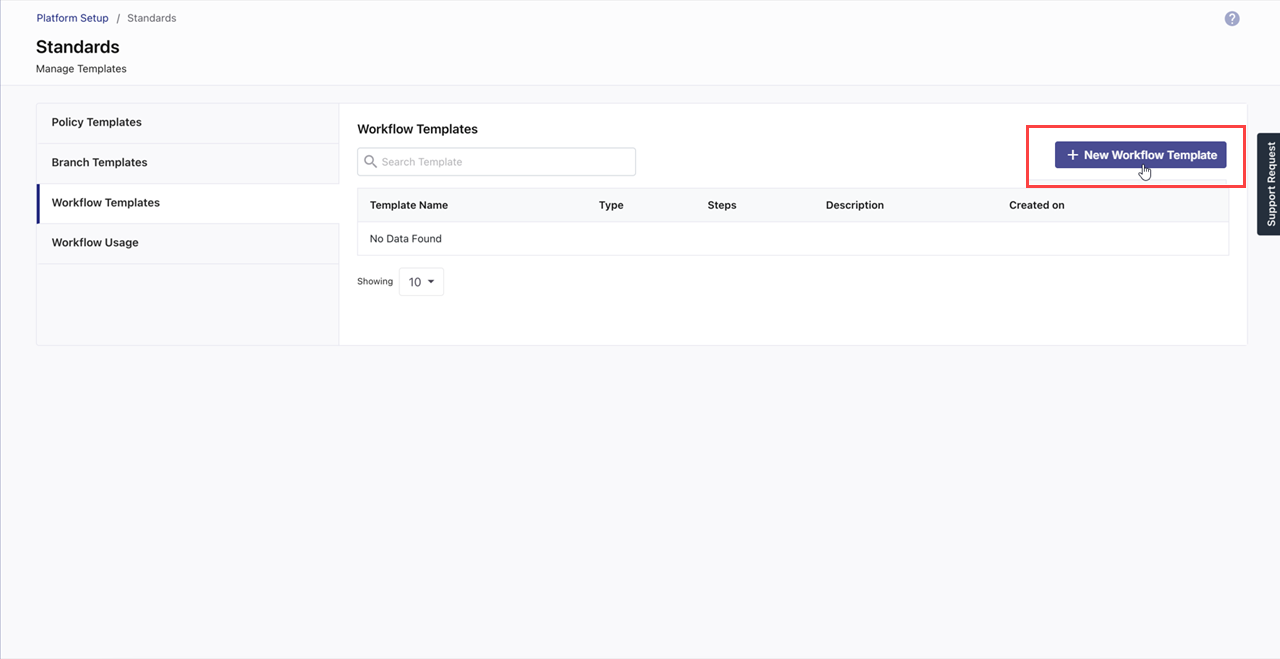
On the Standards screen, click Workflow Templates.
-
To start creating a workflow template, click +New Workflow Template.
-
Provide the following details:
-
Name: A unique name for the workflow template.
-
Category: Select one of the following options:
-
DIS: Select this category if you want to design a workflow template specifically to be used in your data pipelines. In Calibo Accelerate Data Pipeline Studio, a separate Workflow stage can be added in a data pipeline. The templates you create under the DIS category are available for selection in the Workflow stage. Each template includes predefined approval stages (one or more) with assigned approvers. This introduces approval process before data moves further in the pipeline. This ensures that only validated data progresses to the next stage, enhancing data governance and quality control.

Note:
For the DIS category, currently, only sequential workflow is supported.
-
General: For any workflow other than for data pipelines, select the General category.
-
-
Description: Provide a description of the template. You can explain the purpose of the workflow.

-
-
In a blank template, you will see:
-
A Start node which shows the entry point of the workflow.
-
An End node which shows the end of the workflow.
-
The
 icon, which allows you to add workflow stages.
-
-
Click the
 icon. An Approval Stage is added. This is the default name of the stage. Click the stage node.
 -
In the Configuration Details side drawer, provide a name for the level you want to add. For example, Approval_Level_1_Finance.
-
In the Step Type list, select one of the following options:
 Approval
This option allows you to create an approval workflow template within the Calibo Accelerate platform. Approvals are managed internally, ensuring that designated reviewers validate and approve requests before proceeding to the next stage.
If you select the Approval step type, do the following to complete the approval stage configuration:
-
In the Select Reviewer list, select a user who will be responsible for approving the request.
-
Click Save.
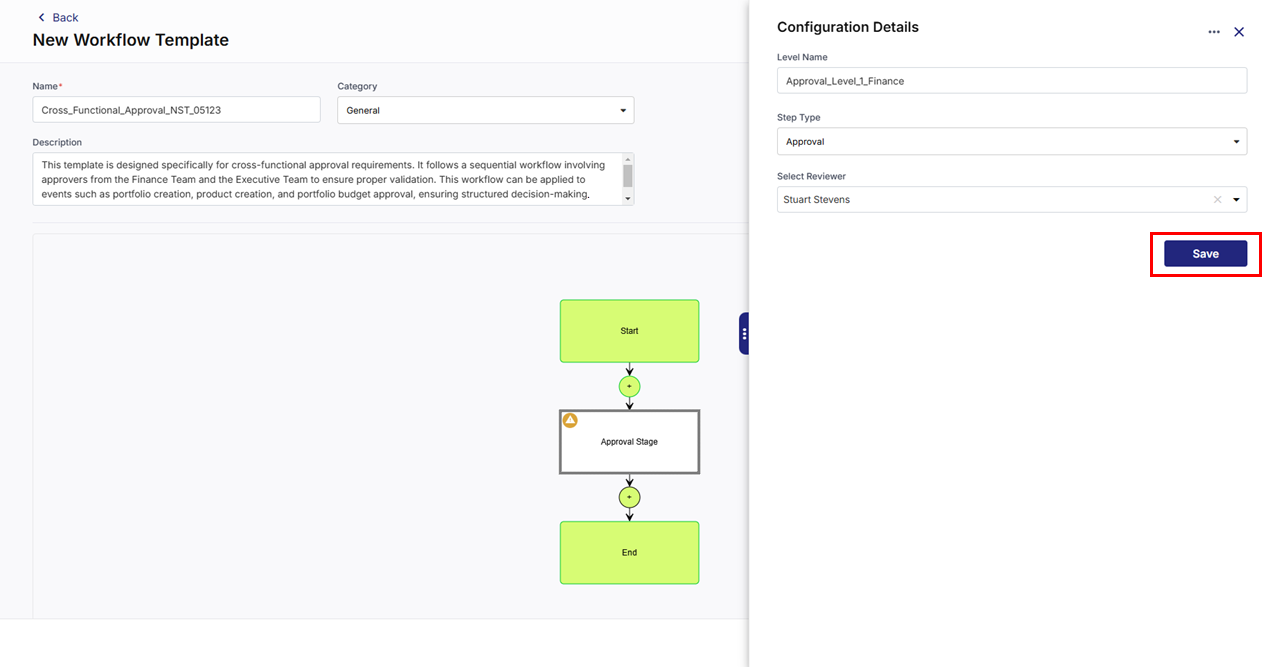
The configured stage appears in the workflow design and is visually indicated with the
 icon (a green checkmark), confirming its successful addition.
  Service Provider
This option enables integration with an external service management tool, such as ServiceNow, to streamline approvals and incident management. When a workflow with this step type is triggered, a ticket is automatically created in the external tool, and further management of that ticket is handled outside the Calibo Accelerate platform.

Note:
To use the ServiceNow ticketing system, make sure you have configured the connection details of your ServiceNow account in Configuration > Cloud Platforms, Tools & Technologies > Systems Integration.
If you select the Service Provider step type, do the following to complete the approval stage configuration:
-
In the Service Provider field, select ServiceNow to enable integration with the external service management tool.
-
In the Title field, the default value is ServiceNow Ticket Creation. You can replace it with a custom title, which will appear as the Short Description in the ServiceNow ticket automatically created when the workflow is triggered in the Calibo Accelerate platform.
-
In the Description field, provide relevant details. This text will appear in the Description field of the ServiceNow ticket, helping stakeholders understand the context of the request.
-
Click Done to finalize the stage configuration.
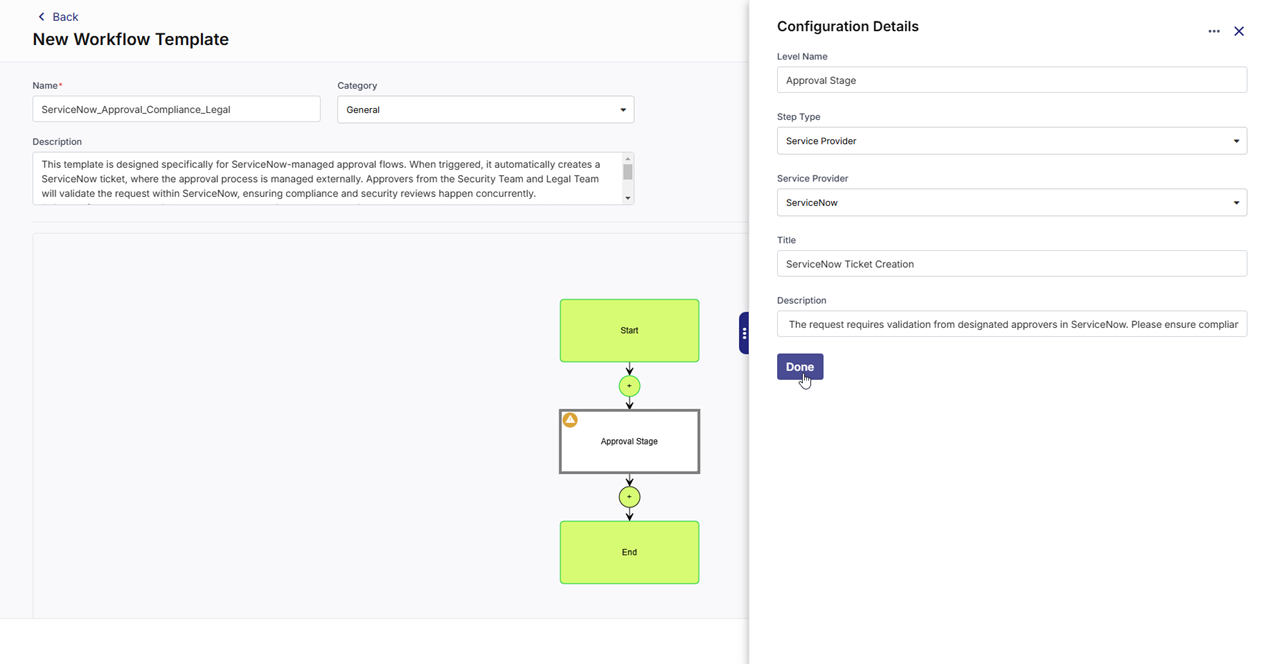
The configured Service Provider stage is now added to the workflow template and is visually indicated with the
 icon (a green checkmark), confirming its successful addition. This stage will automatically trigger a ServiceNow ticket when the workflow is executed.
 -
-
Repeat this process to add multiple approval stages as needed. You can create any combination of the Approval and Service Provider stages in the template as per your needs.
-
The structure of your workflow will be based on the type of approval process you need. Calibo Accelerate supports three types of workflows: Sequential, Parallel, and Hybrid, each catering to different business needs and process complexities.

Note:
For the DIS category, currently, only sequential workflow is supported.
 Sequential Workflow
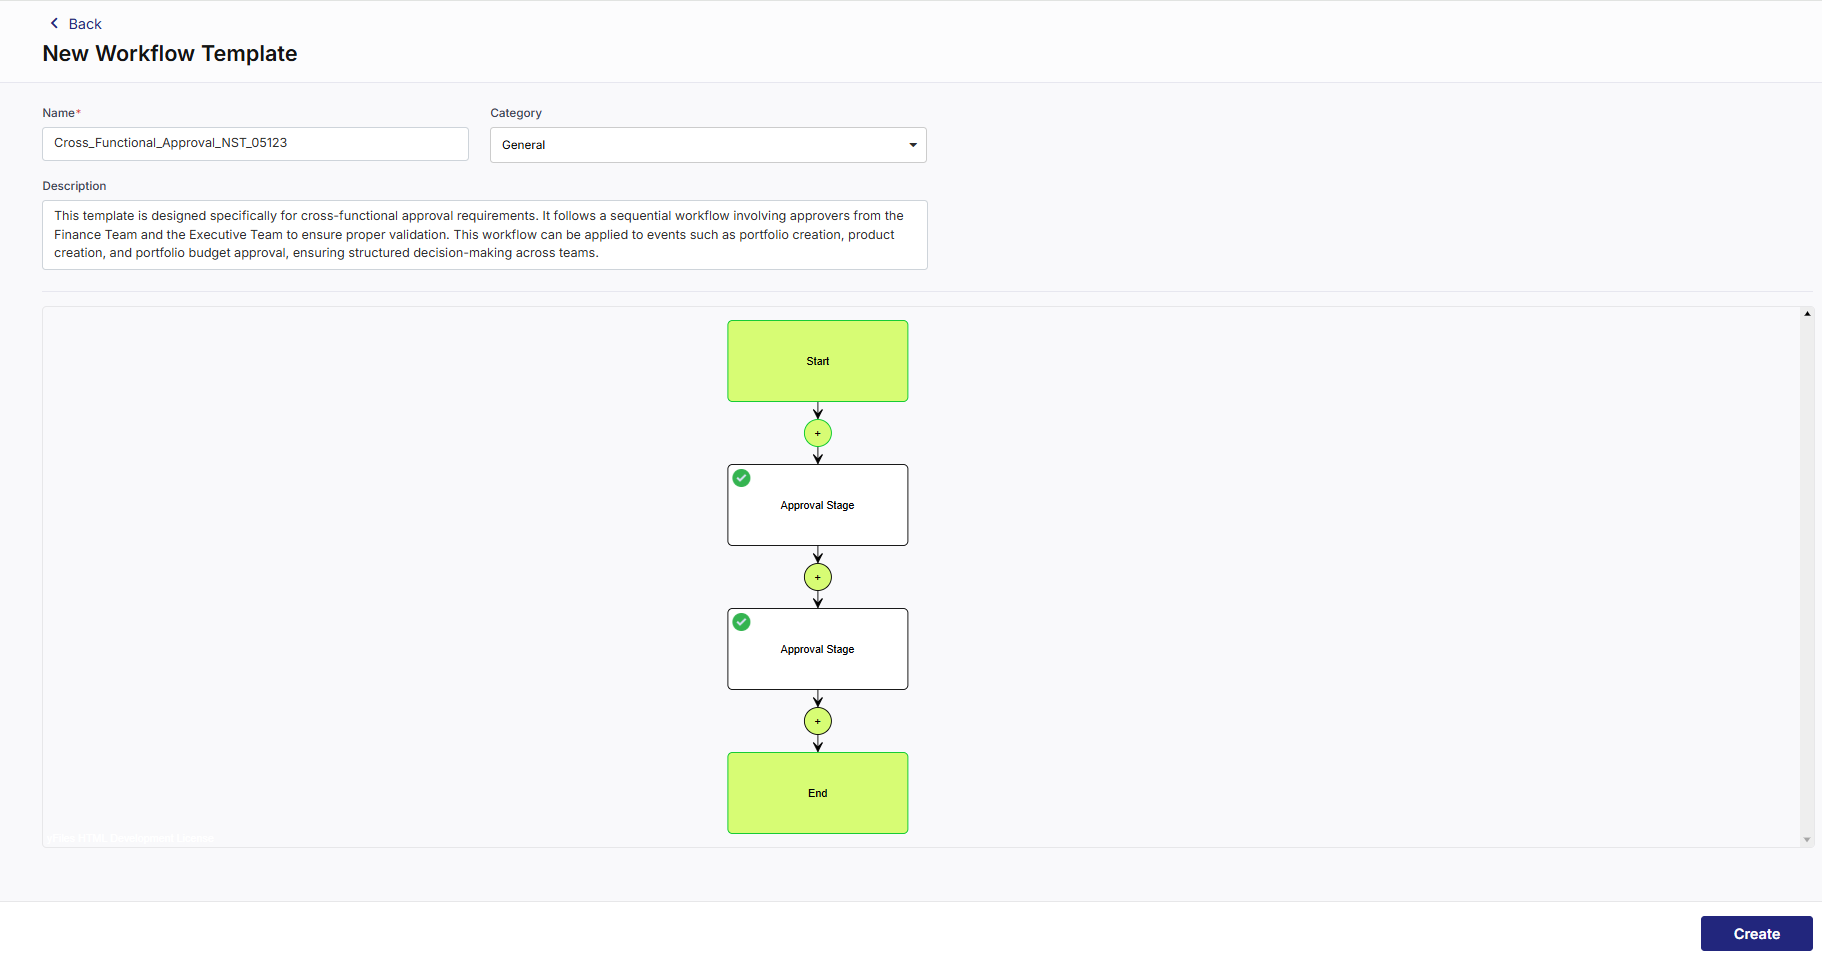
A Sequential Workflow is a structured approach where approvals occur in a strict order. Each stage must be approved before moving to the next, making it ideal for processes where dependencies between tasks are critical.
Example
For a product portfolio creation approval workflow in Calibo Accelerate:
-
A Portfolio Owner submits a request to create a new product portfolio.
-
The Finance Team reviews the portfolio budget and resource allocation.
-
After the request is approved by the Finance Team, the Executive Team provides final approval before portfolio creation.
This ensures that all new product portfolios are reviewed for strategic alignment and budget feasibility before being added to the platform.
To create a sequential workflow:
-
Click the
 icon below each approval stage to add new stages sequentially.
 -
Configure each stage as described earlier.
 Parallel Workflow
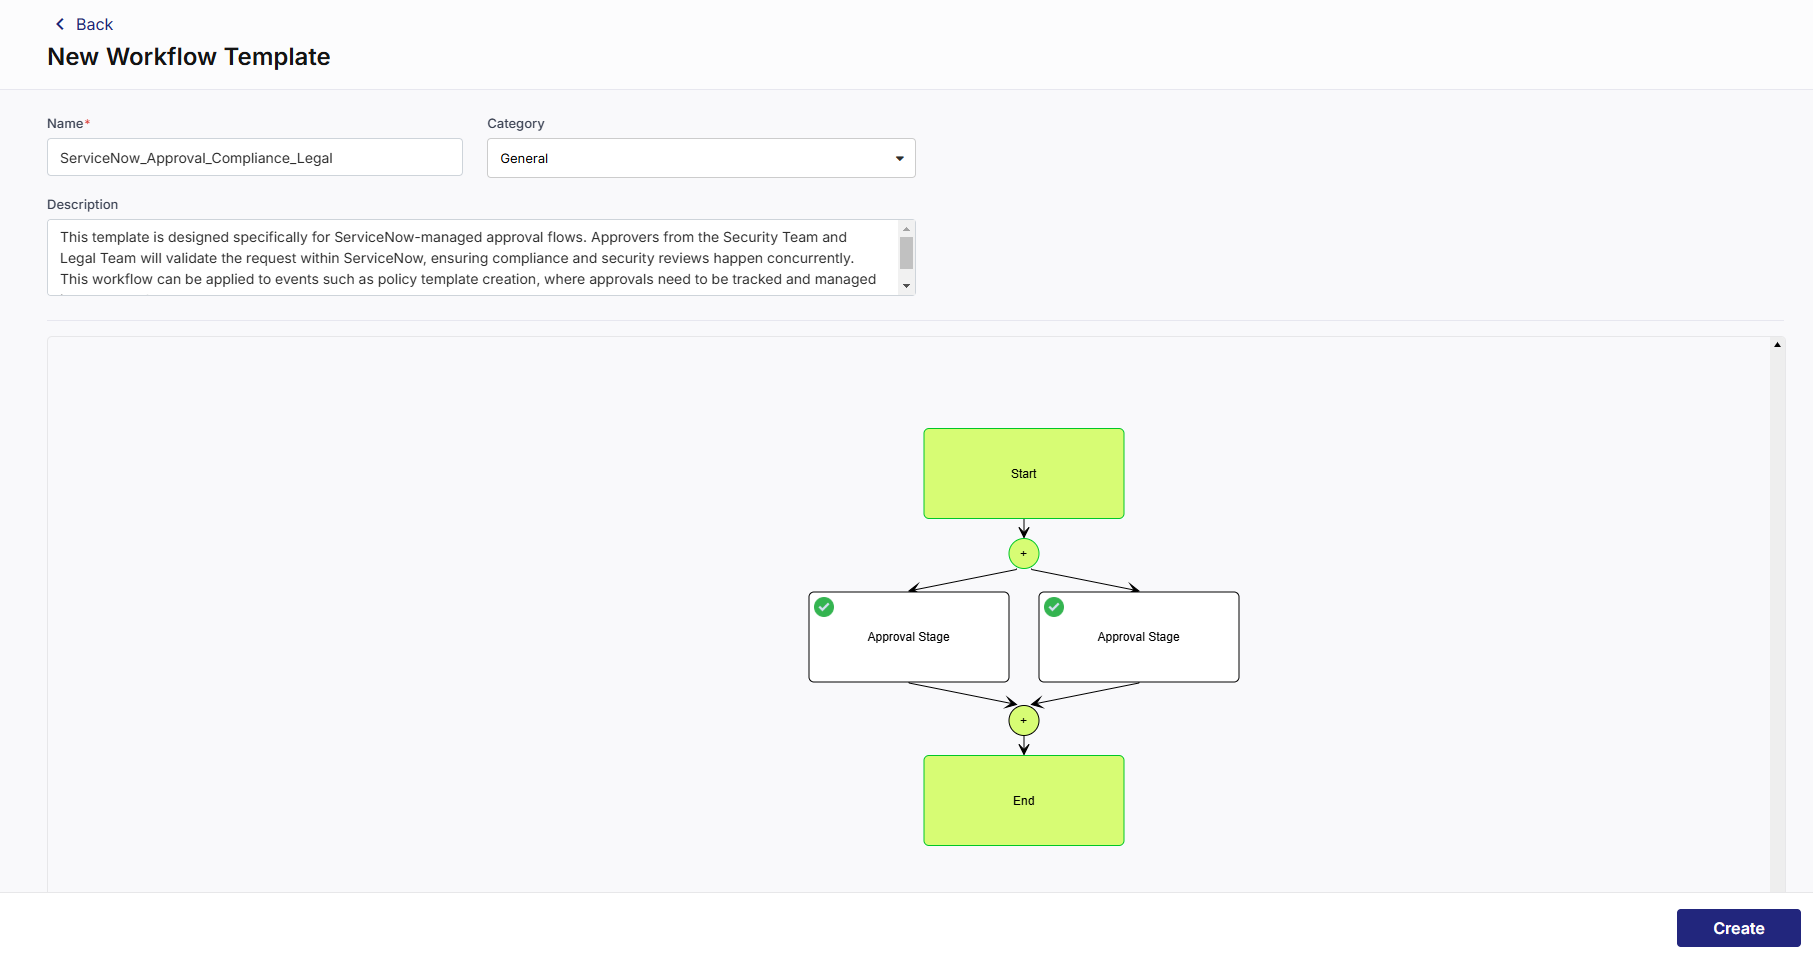
A Parallel Workflow enables multiple stages to proceed simultaneously, expediting approvals when different approvers can independently validate a request.
Example
For a policy template enforcement workflow in Calibo Accelerate:
-
A Compliance Manager submits a new policy template for review.
-
The Security Team and Legal Team assess the policy simultaneously:
-
The Security Team ensures it meets governance and regulatory requirements.
-
The Legal Team reviews for adherence to industry standards and contractual obligations.
Both teams provide their approvals in parallel.
-
To create a parallel workflow:
-
Click the
 icon above an existing approval stage to add parallel nodes. You can add multiple parallel nodes as per your approval process.
 -
Configure each stage as described earlier.
 Hybrid Workflow
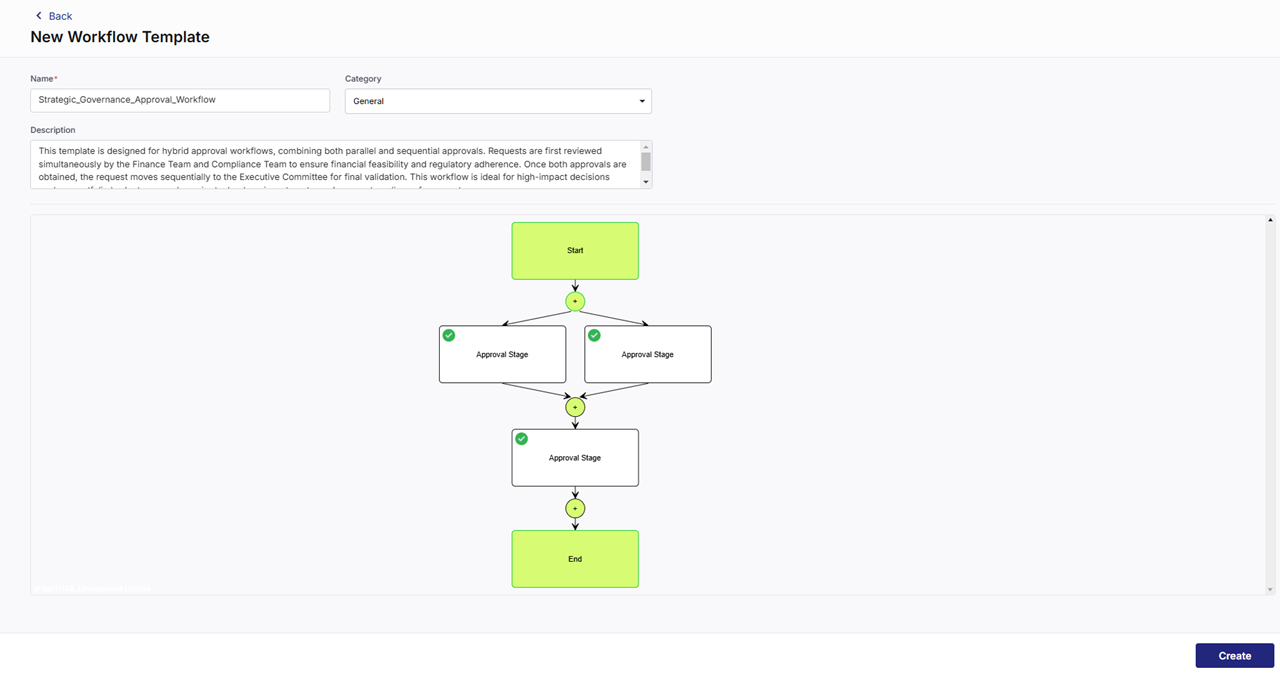
A Hybrid Workflow is a combination of Sequential and Parallel workflows. This allows some tasks to follow a strict order while others can be approved simultaneously, making it ideal for complex processes that need both structure and flexibility.
To create a hybrid workflow, you can add a mix of sequential or parallel nodes as mentioned earlier.
Example
For a product portfolio budget approval workflow in Calibo Accelerate:
-
A Portfolio Owner submits a budget request for a new product portfolio.
-
The Finance Team and Compliance Team review the request simultaneously:
-
The Finance Team evaluates cost allocations and financial feasibility.
-
The Compliance Team ensures adherence to company policies and legal requirements.
-
-
Both teams provide their approvals in parallel.
-
The Executive Committee provides the final approval before the budget is allocated.
-
-
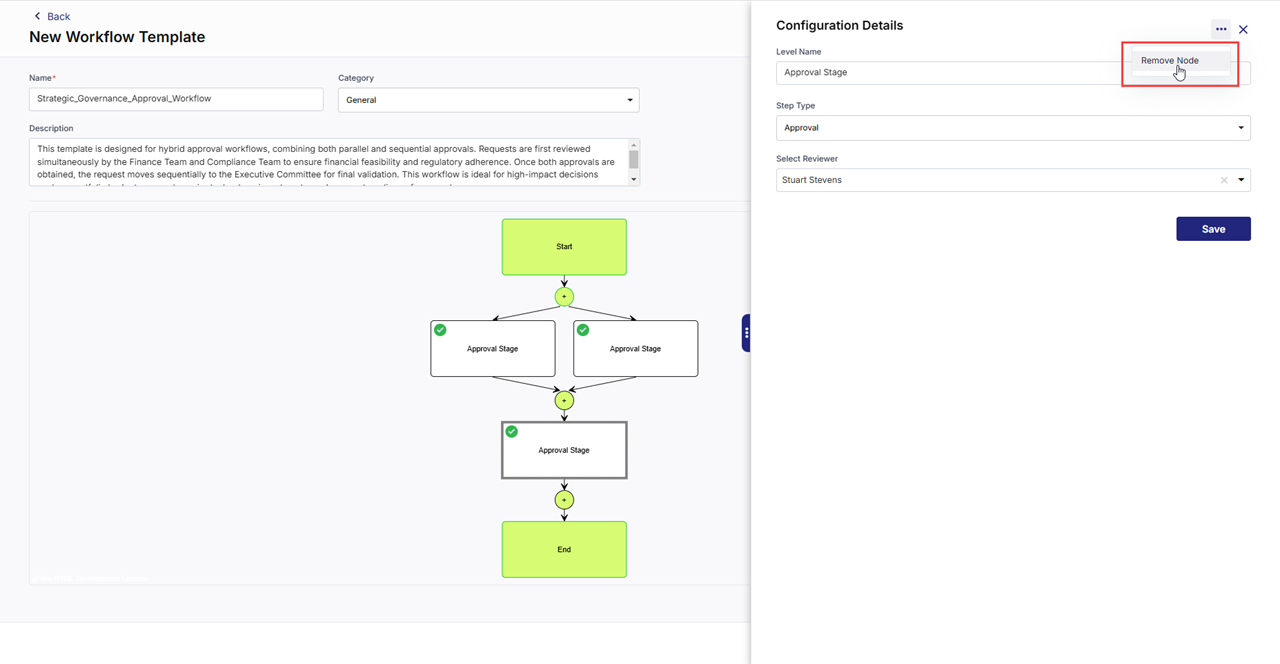
To remove an unwanted stage from the workflow, click the stage node, and then in the Configuration Details side drawer, click the ellipsis (...) and then click Remove Node.
-
Click Create to save the workflow.
The workflow template is added to the Workflow Templates tab.
To know how the Workflow stage in a data pipeline works, see Workflows in Data Pipeline Studio.
Managing Workflow Templates
Managing workflow templates in Calibo Accelerate ensures that approval processes remain organized, up-to-date, and aligned with business needs. As workflows evolve, administrators may need to edit, review, or delete existing templates. This section covers how to efficiently manage workflow templates.
Viewing Workflow Templates
-
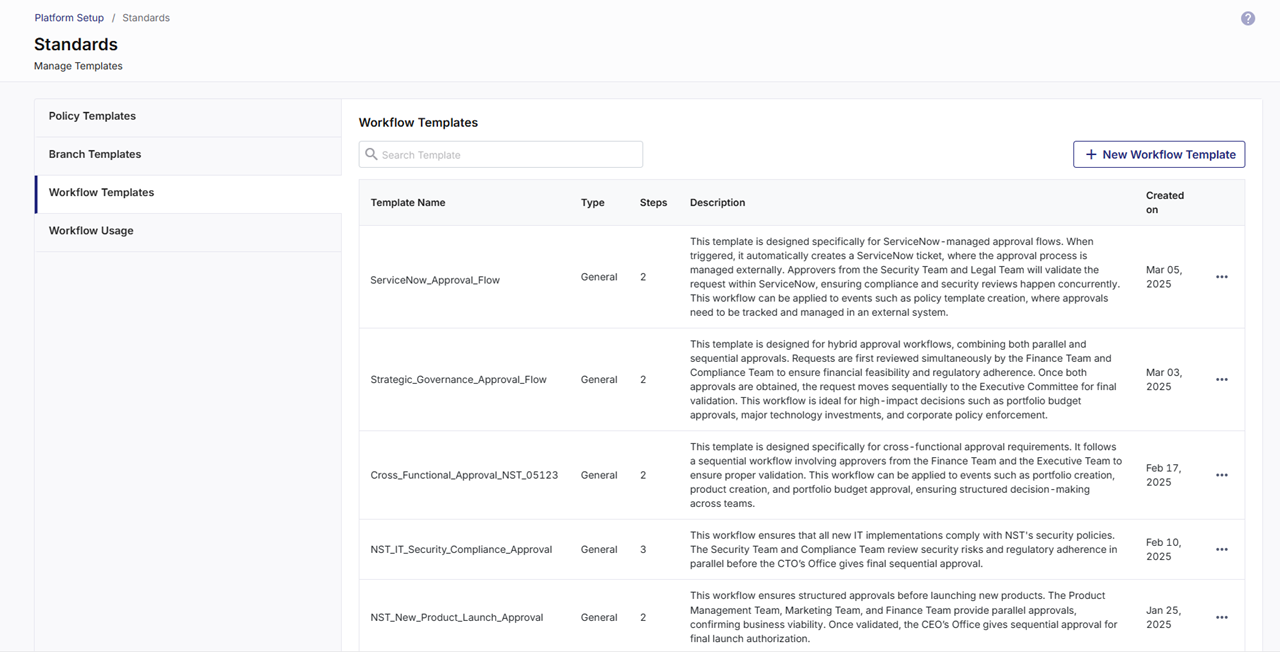
Templates are listed in reverse chronological order, with the most recently created ones listed first.
-
The following details of a template are available:
-
Template Name: Displays the unique name assigned to the workflow template, helping users quickly identify different templates.
-
Type (General / DIS): Indicates whether the template falls under the General category (applicable to most workflows) or DIS (specific to data pipeline workflows).
-
Steps: Shows the total number of approval steps configured within the workflow, providing insight into the complexity of the approval process.
-
Description: A brief summary of the workflow's purpose.
-
Created On: Displays the date when the workflow template was created, helping track versions and recent updates.
-
-
In the search bar, search for a specific template by its name.
-
Adjust pagination settings to view 10, 25, 30, or 50 templates per page.
Editing a Workflow Template
You can make changes to a saved workflow template at any time. To edit a template, do the following:
-
Sign in to the Calibo Accelerate platform and then, from the left navigation pane, click Configuration.
-
On the Platform Setup screen, click the Standards tile.
-
On the Standards screen, click Workflow Templates.
-
Locate the template you want to edit. Then in the extreme right in the template details grid, click the ellipsis (...), and click Edit.

-
Modify approval stages or assignees as needed. You can makes changes in the name and the description of the template. You cannot change the category (General or DIS) in the edit mode.
-
Click Save.
Deleting a Workflow Template
You can delete a workflow template if it is not associated with any events. To delete a workflow template, do the following:
-
Sign in to the Calibo Accelerate platform and then, from the left navigation pane, click Configuration.
-
On the Platform Setup screen, click the Standards tile.
-
On the Standards screen, click Workflow Templates.
-
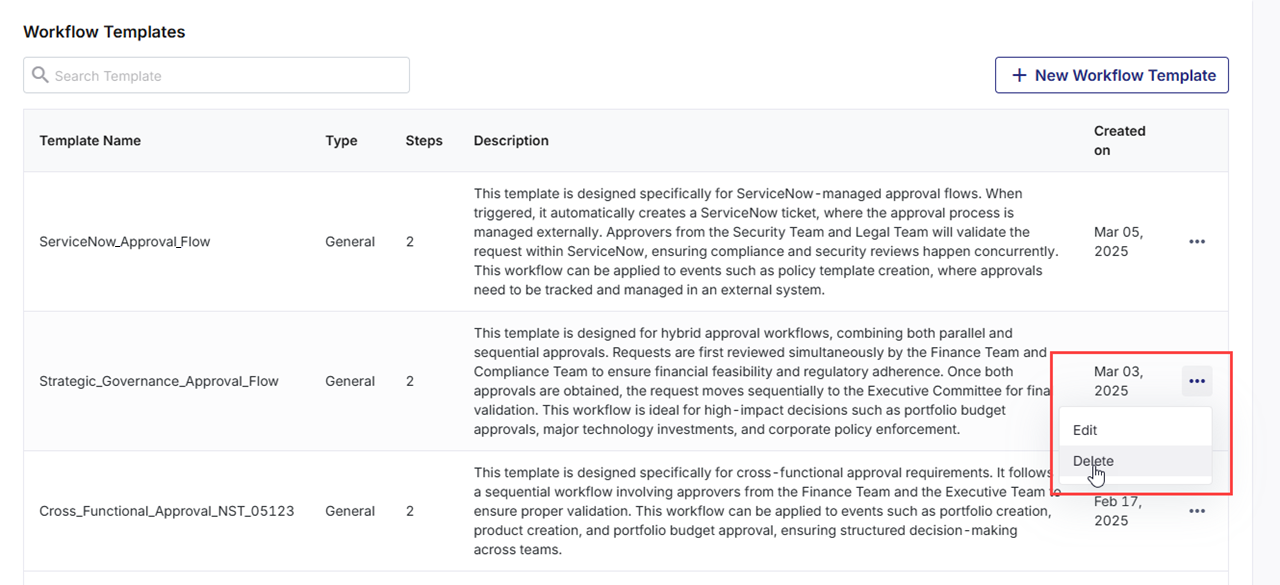
Locate the template you want to delete. Then in the extreme right in the template details grid, click the ellipsis (...), and click Delete.
-
If the template is in use, it must be removed from associated workflows before deletion.
| What's next? Enabling Global Workflows |