Edit Your Microsoft Active Directory SSO Settings
You can update your existing Microsoft Active Directory SSO configuration using the following steps:
Note:
Only platform administrators or users with appropriate permissions can edit SSO settings.
Prerequisite
When editing your Microsoft Active Directory SSO configuration, you may need to reimport updated SAML metadata. Ensure that the Federation Metadata XML document is available in one of the following ways:
Option 1: Use Existing Federation Metadata URL
If your organization has already published a Federation Metadata URL (for example, via public DNS or internal ADFS endpoint), you can use the same URL to import metadata again.
Ensure the URL follows the standard format:
https://<your-domain>/federationmetadata/2007-06/federationmetadata.xml
Option 2: Download Updated Federation Metadata XML
If the file must be refreshed or manually imported, follow these steps:
To download the federation metadata XML, do the following:
-
Sign in to the ADFS server and open the AD FS Management Console..
-
In the AD FS folder in the left pane, expand Services and click Endpoints.
-
In the Metadata section, locate the entry of the type Federation Metadata with a URL path ending in
/federationmetadata/2007-06/federationmetadata.xml. Copy this URL. -
Append your domain to the copied URL. The URL format should look like this:
https://{domain-name}/federationmetadata/2007-06/federationmetadata.xml -
Paste the adjusted URL into a browser’s address bar and press Enter.
-
Download the file and save it to your computer.
You can now use this file to update the SSO configuration in Calibo by selecting the Import from IdP Metadata File option.
Steps to Edit SSO Settings
To edit your SSO configuration for Microsoft Active Directory, do the following:
-
Go to Platform Setup > Security & SSO.
-
In the Configured Identity Provider section, you will see your existing Microsoft Active Directory SSO configuration.
-
In the SSO SAML Configuration card, click the ellipsis (⋯) and select Edit.
-
The following confirmation message appears. Click Proceed to continue.

-
On the Edit Single Sign-On screen, your existing Microsoft Active Directory SSO configuration is displayed. You can review or edit the values as mentioned in the following steps:
1. Configured Domain
When editing Microsoft Active Directory SSO settings, the domain field is auto-populated with the domain that was used in your previous configuration.
You cannot edit this field — Calibo enforces the same domain to ensure continuity of user identity mapping.
Select the following checkbox:

2. Configure SSO Details
In this section, you can edit your SAML configuration details of Microsoft Active Directory. Do the following:
Make changes to your SSO details by using one of the following options:
 Configure Manually
Use this option to manually update or correct individual SAML parameters.
Single Sign-On Service URL: The ADFS endpoint where authentication requests are sent.
Single Logout Service URL: The endpoint for handling logout requests across services.
X.509 Certificate: The X.509 certificate used to verify the authenticity of incoming SAML assertions from Microsoft AD.
 Import from URL
Use this option to fetch the updated metadata configuration from Microsoft Active Directory using a Federation Metadata URL.

Click Import to retrieve the SSO configuration values. The following fields are auto-filled upon successful import:
Single Sign-On Service URL
Single Logout Service URL
X.509 Certificate
Import from IdP Metadata FileUse this method if you have the metadata XML file exported from your ADFS setup. Upload the AD FS Federation Metadata XML document by dragging it into the upload area or by clicking Browse this computer. After the upload is complete, click Import.
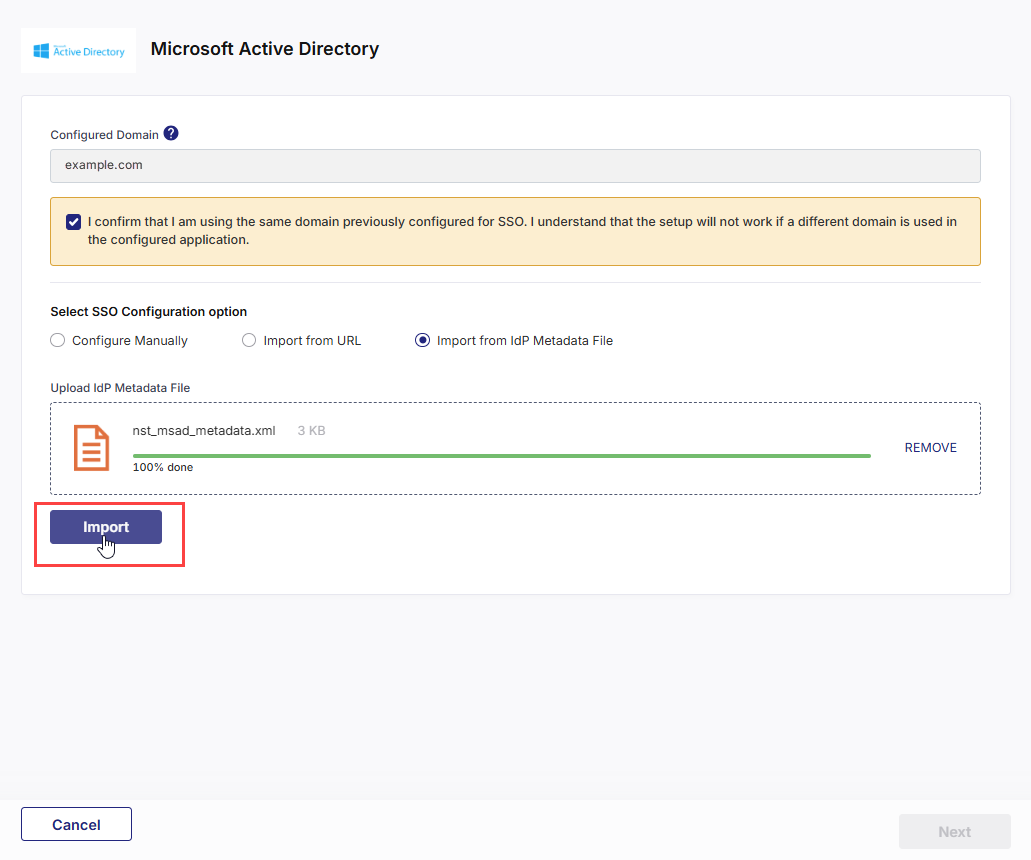
Details such as your Single Sign-on Service URL, Single Logout Service URL, and X.509 Certificate are auto-populated after you import the document.
Click Previous to return to the previous screen.
Click Next to proceed.
Click Cancel and then, in the confirmation message, click Yes to discard your unsaved identity provider configuration changes and go back to the previous screen.
3. Create AD FS Relying Party Trust
At this stage, the SSO configuration updates in the Calibo Accelerate platform interface are complete and the federation metadata file is available for download.

To complete the SSO configuration in Microsoft Active Directory, download and save the federation metadata XML file.
Create a relying party trust in the Active Directory Federation Services (AD FS) Management Console by using the downloaded XML file. This establishes a trust relationship between Calibo Accelerate and your Active Directory Federation Services (AD FS) instance. This trust allows AD FS to authenticate users on behalf of Calibo Accelerate.
For more details, see Creating a Relying Party Trust in the AD FS Management Console.
4. Validate Single Sign-On
-
After you create the AD FS relying party trust for Calibo Accelerate successfully, on the screen from where you downloaded the federation metadata XML file, in the Validate Single Sign-On section, click Validate.

-
This takes you to the Calibo Accelerate platform sign-in screen. Use SSO credentials for user authentication. After a successful authentication redirection and SSO validation, the following success message is displayed.

-
Return to the SSO configuration screen and click the Refresh icon to complete your SSO configuration.

-
After you see the message confirming that your SSO validation is successful, click Finish to complete the configuration.

After you click Finish, your current session will automatically end. You will be logged out of the platform and will need to sign in again using your valid SSO credentials.
Steps to Edit LDAP Configuration
You may need to update LDAP settings if your Active Directory server details change, if you rotate service account credentials, or if connection testing fails due to outdated Bind DN or password.
To update the LDAP settings used for Single Sign-On:
-
On the Platform Setup > Security & SSO screen, go to the Configured Identity Provider section.
-
Under Microsoft Active Directory, locate the LDAP card.
-
Click the ellipsis (︙) menu on the LDAP card and select Edit.
-
On the Configure LDAP for Single Sign-on screen, update the necessary connection parameters:
-
LDAP Server Address: IP address or host name of the LDAP server.
-
Bind DN: Distinguished Name (DN) used to authenticate with the server.
-
Bind Password: Password associated with the Bind DN.
-
-
Secure connection details with password (optional)
To password-protect your LDAP server connection details, enable this option, enter a password, and then retype it to confirm.
-
Click Test Connection to verify the updated details.
-
Save the updated configuration to apply the changes.