Custom Fields Settings
What are custom fields?
Custom fields are additional data fields that you can define for various areas across the Calibo Accelerate platform. Custom fields help you capture specific information that may not be covered by the default fields within the platform. By using custom fields, you can tailor the platform to meet your unique business needs and gather additional data relevant to your processes.
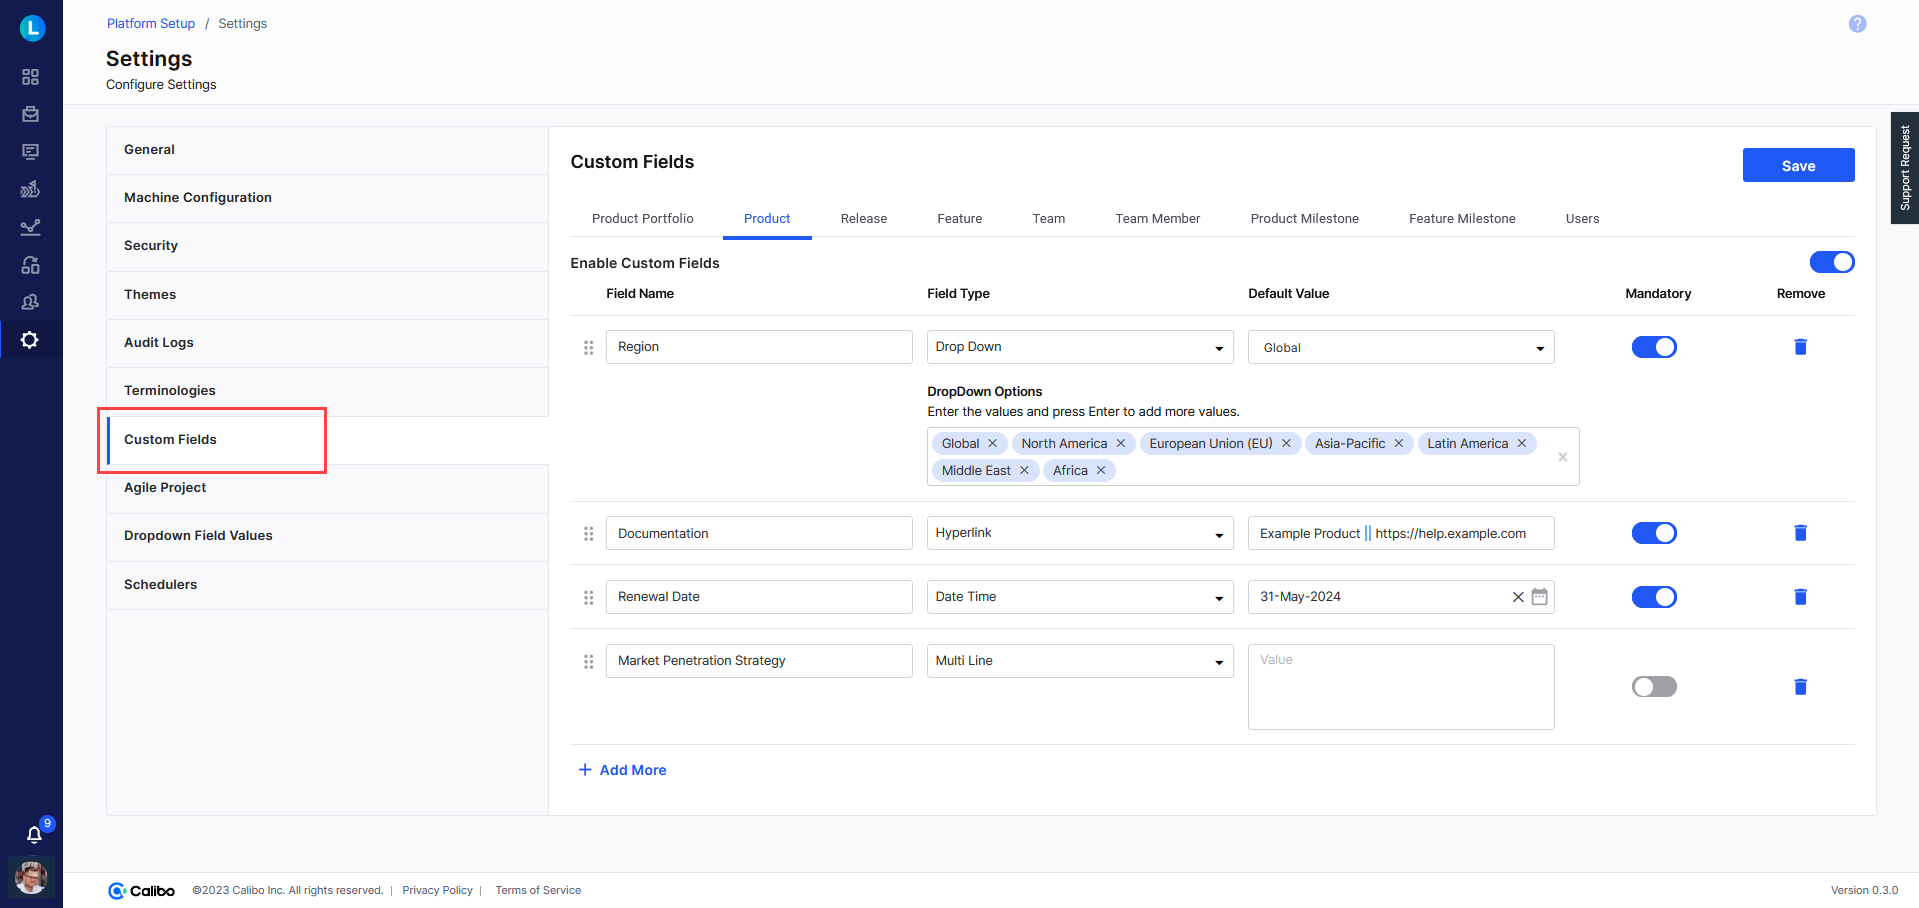
For example, you may want to add a custom field "Region" to capture specific information related to the geographic region or location associated with the product and make it a mandatory field. This means that when adding or editing product details, users must input the relevant region in the "Region" custom field. This information can be useful for products with regional variations, different distribution strategies, or specific market penetration goals.

Defining Global Custom Fields
Custom fields defined in the global settings of the Calibo Accelerate platform are applied globally. For example, custom fields defined on the Product tab are visible in all the products that you create from within the platform. However, you can also add product-specific custom fields as required when you create or edit a product individually.To define the global custom fields, do the following:
Sign in to the Calibo Accelerate platform and click Configuration in the left navigation pane.
- On the Platform Setup screen, on the Settings tile click Configure.
- On the Settings screen, on the Custom Fields tab, you can enable custom fields for the following areas of the Calibo Accelerate platform.
Product Portfolio
Product
Release
Feature
Team
Team Member
Product Milestone
Feature Milestone
Users
In each area where you want to use custom fields, turn on the Enable Custom Fields option.
To add more custom fields, click +Add More.
- Provide the field name.
- Select the field type. The following field types are available.
Field Type Description Single Line A single line field allows users to input and display a single line of text or a short string of characters (no longer than 256 characters). Use this field to capture concise information such as names, titles, email addresses, phone numbers, or other brief descriptions.
Multiline In this field, users can input multiple lines of text or larger blocks of content. Use a multiline field to accommodate more extensive information such as descriptions, comments, notes, or paragraphs.
Dropdown A dropdown field provides a predefined list of options to choose from. Users can select one option from the list. Use this field to capture categorical or discrete data, where users need to select a single choice from a set of available options.
In the Dropdown Options box, predefine the options. Enter a value and press Enter to confirm and to add the next value.
Date Time A date field allows users to input dates. Users can choose a date from a calendar picker or manually enter it in the DD-MM-YYYY date format. Date fields are commonly used to record event dates, deadlines, milestones, or any other time-related information. Hyperlink This allows users to add a clickable link or URL to the data. Hyperlink fields are beneficial for referencing external content, such as websites, documents, or references within the context of the data being managed.
You must add a hyperlink in the following syntax:
Name || Link
For example, My Product Name || https://help.sample.com
Rich Text A rich text field allows users to create and format content with options such as headings, bold, italic, underline, alignment, bullet and numbered lists, hyperlinks, images, tables, and code snippets. Use this field to capture detailed and well-structured information such as release notes, acceptance criteria, or comprehensive descriptions. If you choose Rich Text, the mandatory field option is disabled by default and cannot be enabled. You can add the Rich Text for Product Portfolio, Product, Release, and Feature. - If you mark a field mandatory, you must also set its default value. A default value ensures that the custom field always contains a value, even if users don't explicitly provide one. This helps maintain data consistency by ensuring that the field is never left empty or undefined. Prefilled default values provide a context or suggest a preferred choice to users. This improves the overall user experience by reducing the cognitive load and offering guidance during data entry.
Click Save to apply your changes.
That’s it! The custom fields are now visible in the specified areas on the platform interface.
| What's next? Agile Project Settings |