Configuring Ingress Controllers for Kubernetes Clusters
To enable external access to services deployed in your Kubernetes cluster, you must configure an ingress controller. Ingress controllers manage how incoming traffic is routed to your workloads based on defined routing rules. Calibo Accelerate lets you configure multiple ingress controllers—such as NGINX, Azure Application Gateway, and AWS Application Load Balancer (ALB)—at the global cluster connection level. These serve as predefined ingress controllers for technology deployments within the associated Kubernetes cluster and can optionally be overridden at the deployment stage level if permitted.
Adding Ingress Controller Configuration Details
To provide the details of an ingress controller, do the following:
On the Kubernetes connection details screen, in the Ingress Controller Configurations (Optional) section, click Add.
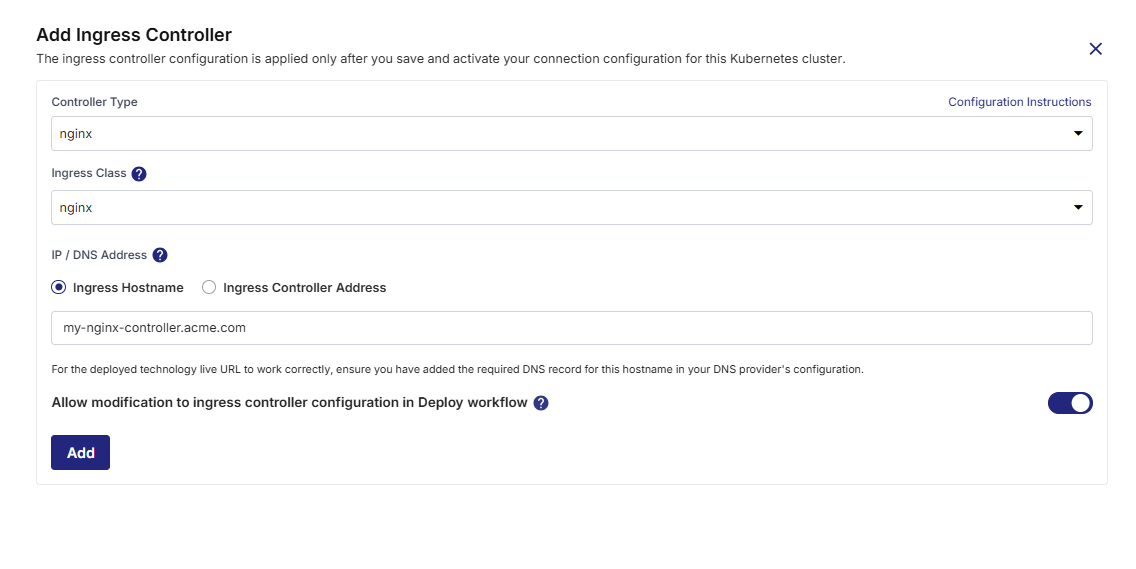
This opens the Add Ingress Controller side drawer. Use this drawer to configure one or more ingress controllers for the Kubernetes cluster.
In the Controller Type dropdown, select the ingress controller type you want to configure. Available options include:
application-gateway (Azure-specific)
Azure Application Gateway Ingress Controller (AGIC) allows Application Gateway to expose Kubernetes services over HTTP/S. It integrates directly with Azure networking and provides advanced features such as SSL termination, path-based routing, and Web Application Firewall (WAF) capabilities.
Click Configuration Instructions to open the official Azure documentation for AGIC setup.
Typically used with AKS clusters.
nginx
NGINX Ingress Controller is a widely used open-source option to manage external access to services in Kubernetes clusters. It supports advanced traffic management features such as rate limiting, SSL termination, URL rewrites, and custom routing rules.
Click Configuration Instructions to view the installation steps for NGINX ingress.
Compatible with both EKS and AKS clusters.
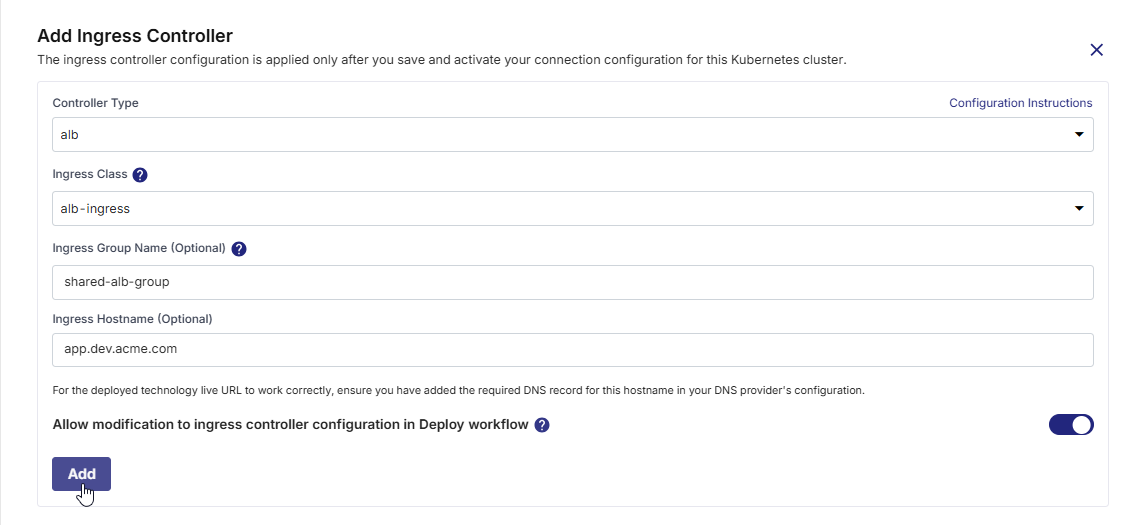
alb (AWS-specific)
AWS ALB Ingress Controller (also known as AWS Load Balancer Controller) allows the use of AWS Application Load Balancers to route traffic to Kubernetes workloads. It supports dynamic provisioning of ALBs, path-based routing, SSL termination, and integration with AWS security features.
Click Configuration Instructions to open the AWS documentation for setting up the ALB ingress controller.
Specifically designed for EKS clusters.
Ingress Class
Select an Ingress Class from the list.
This class identifies the ingress controller responsible for managing ingress resources in the cluster.
Ingress classes let you define routing rules, host/path configurations, and traffic control for services deployed in Kubernetes.
IP / DNS Address Configuration
For the Application Gateway and NGINX controller types, in the IP / DNS Address section, select how you want to provide the address of the ingress controller:
Ingress Hostname: Provide the DNS hostname (for example,
app.acme.com) that resolves to your ingress controller. The hostname must start and end with a letter or number in lower case and may include letters (in lower case), numbers, "-", and "."
Important:
For the deployed technology’s live URL to work correctly, ensure the DNS hostname is properly configured in your DNS provider’s settings with an appropriate A or CNAME record pointing to your ingress controller.
Ingress Controller Address: Provide the external IP address or load balancer IP exposed by the ingress controller.

If you select alb as the controller type, provide the following:
Ingress Group Name (Optional):
Specify a group name to associate multiple ingress resources with the same ALB. All ingress resources with this group name share a single ALB.
Ingress Hostname (Optional)
Provide the hostname that routes to the ALB.
Ensure corresponding DNS configuration is in place for successful routing.

Allow Modification at Deploy Stage Level
Enable the Allow modification to ingress controller configuration in Deploy workflow toggle if you want to give developers the ability to override this global configuration at the stage level in the deployment pipeline.
Enabled: Developers can modify or override ingress settings per stage.
Disabled: The settings defined here are enforced and standardized across deployments.
Click Add. The ingress controller is now added and displayed in a table. For each added controller, the following fields are shown:
Ingress Class
IP / DNS Address
Ingress Group Name (if applicable)
Modification Allowed toggle

Important:
Default Controller: The first ingress controller added is automatically marked as Default. This default controller is used for all technology deployments in this Kubernetes cluster, unless overridden at the product deployment stage level. If multiple ingress controllers are configured, you can select a different default by using the three-dot menu. You cannot delete the controller marked as default — switch the default first to delete it.

Once you have added and reviewed all ingress controllers, click Done to close the drawer and return to the cluster Kubernetes cluster connection details screen.
Editing Ingress Controller Configuration Details
Note:
Editing ingress controller configuration may affect your existing technology deployments. You may need to redeploy the technologies for products that use the ingress controller configuration you edit.
After you save your ingress controller configuration changes, you must save and activate your Kubernetes cluster connection details configuration again to make your changes effective.
After you edit the global ingress controller configuration, a message informing users about the configuration changes is displayed at the stage level within the Deploy phase where the Kubernetes cluster in question is used for deployments.

Users can review the ingress controller configuration changes and apply them for all future deployments. If you allow modifications to this configuration at the stage level, users can edit it to their requirements.
To update ingress controller details:
-
In the table of added ingress controllers, click the ellipsis (⋯) next to the controller you want to edit.
-
Click Edit.
-
Make the desired changes in the configuration details.
In edit mode:
-
You cannot change the Controller Type or Ingress Class.
-
For NGINX and Application Gateway, you can edit the IP / DNS Address: either Ingress Hostname or Ingress Controller Address.
-
For ALB, you can edit Ingress Group Name (Optional) and Ingress Hostname (Optional)
-
You can also toggle the Allow modification in Deploy workflow option.
-
-
Click Save to apply the changes or Cancel to discard.
-
Click Done to close the drawer and return to the cluster Kubernetes cluster connection details screen.
Deleting Ingress Controller Configuration
To delete an ingress controller:
-
In the same table, click the ellipsis (⋯) next to the controller you want to remove.
-
Click Delete.
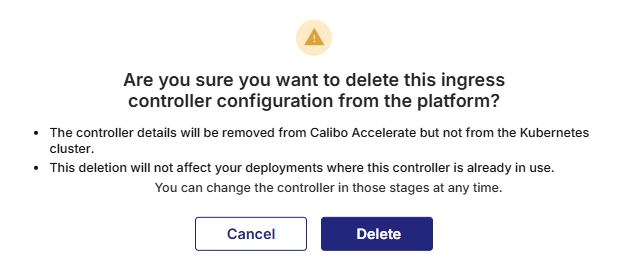
If the Kubernetes cluster connection has already been saved and activated, the following confirmation message is displayed:

Click Delete to proceed.

Note:
Default Controller: The first ingress controller added is automatically marked as Default. This default controller is used for all technology deployments in this Kubernetes cluster, unless overridden at the product deployment stage level. If multiple ingress controllers are configured, you can select a different default by using the three-dot menu. You cannot delete the controller marked as default — switch the default first to delete it.
Changing the Default Controller
The first added ingress controller is automatically marked as the default and is used for all technology deployments.
To change the default controller:
-
Click the ellipsis (⋯) next to a non-default ingress controller.
-
Click Make Default.
The selected controller will now be marked as Default.