Ingesting Data using Snowflake Stream Ingest into a Snowflake Data Lake
In today’s fast-paced business environment, organizations need to effectively leverage the value of data to make informed decisions and stay competitive. With data coming in from IoT devices, mobile apps, and websites, the need for real-time data processing becomes increasingly critical.
Data Pipeline Studio (DPS) supports processing of streaming data using Snowflake stream ingest in the Calibo Accelerate platform.
Before you create a stream ingest data pipeline, ensure that the role assigned to you has the following permissions on Snowflake Stream and Tasks:
-
GRANT CREATE STREAM ON SCHEMA <SCHEMA_NAME> TO ROLE <ROLE>;
-
GRANT CREATE TASK ON SCHEMA <SCHEMA_NAME> TO ROLE <ROLE>;
-
GRANT EXECUTE TASK ON ALL TASKS IN SCHEMA <SCHEMA_NAME> TO ROLE <ROLE>;
-
GRANT EXECUTE TASK ON FUTURE TASKS IN SCHEMA <SCHEMA_NAME> TO ROLE <ROLE>;
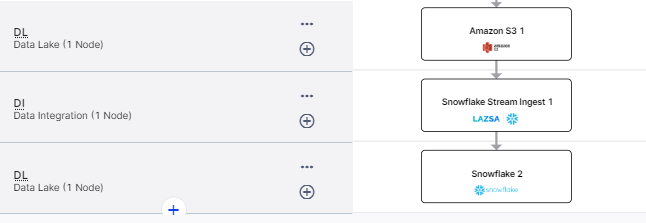
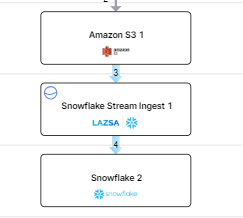
If you are using S3 as a data lake and ingesting data into Snowflake, then this is what your pipeline looks like:

Amazon S3 (Data Lake) > Snowflake Stream Ingest (Data Integration) > Snowflake (Data Lake)
The data is loaded into a landing layer temporarily and then into the unification layer after the selected operation is performed on it. When you ingest streaming data from an S3 bucket into a Snowflake table, you must select a preconfigured storage integration in Snowflake and ensure that your S3 bucket has access to the selected storage integration. See Configuring a Snowflake storage integration to access Amazon S3.
Snowflake Stream Ingest uses Snowpipe to continuously load data from files as soon as it is available. This way near real-time data can be made available for processing. When you create a Snowflake stream ingest job, you create a task and specify the interval for the task. The task interval is the polling frequency at which the data is loaded from source to target after performing the specified operation in the unification layer.
To create a stream ingest data integration job
On the home page of DPS, add the following stages:
Data Lake: Amazon S3
Data Integration: Snowflake Stream Ingest
Data Lake: Snowflake
Configure the Amazon S3 and Snowflake nodes.
Click the data integration node and click Create Job.
For the data integration job creation, provide the following inputs:
Job Name: Provide a name for the data integration job.
Node Rerun Attempts: This is the number of times the pipeline run is attempted on this node in case of failure. By default the setting done at the pipeline level is considered. To change the default setting, you can select an option from the dropdown.
Datastore: This is populated based on the datastore that you configure for the data lake (source) node.
Source Format: Currently DPS supports Parquet format.
Enable Auto Load with Historical Data - Turn on this toggle to load existing historical data and continue to automatically ingest new data as it arrives.
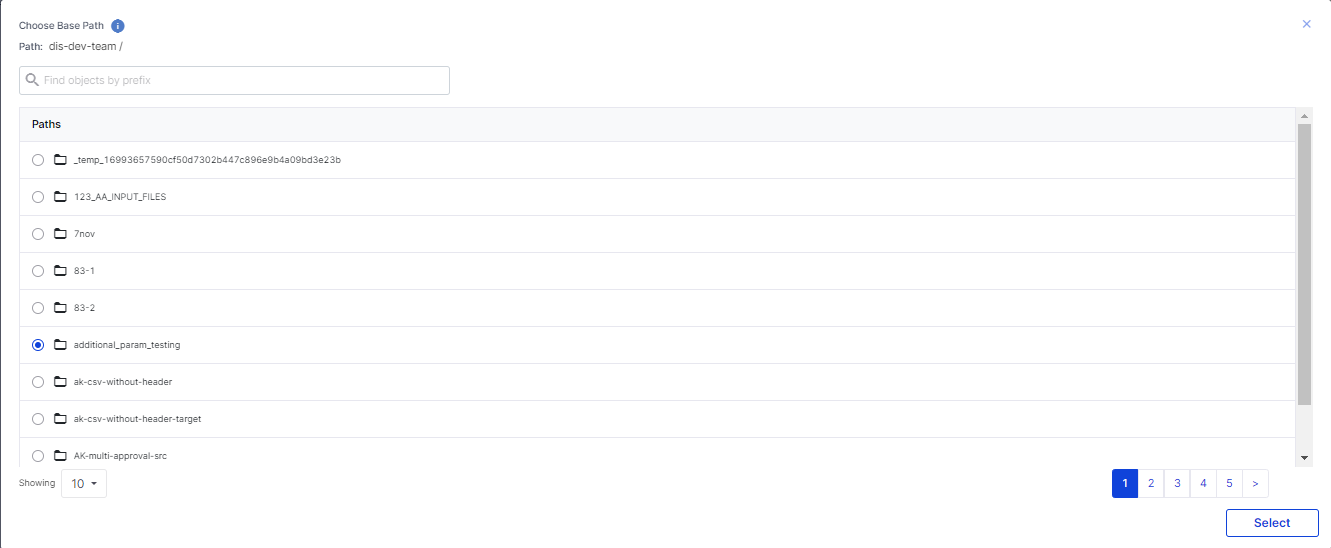
Add Base Path:
Click Add Base Path.
In the Choose Base Path screen, select a path and then click Select.

Click the arrow to view the schema of the selected file.
Click Next.
On the Landing Layer Details screen, provide the following inputs:

Database – this is populated based on the selected database.
Landing Layer Schema – this is populated based on the selected schema.
Create/Choose Landing Layer Table – Either select a table from the dropdown list or create a new table in the landing layer where the data is stored temporarily.
Choose File Format – this is populated based on the file format that you selected for the source stage.
Stage Name for S3 – this is created based on the landing layer table that you create or choose. A suffix Stage is added to it to form the stage name for S3.
Pipe Name – this is created based on the landing layer table that you create or choose. A suffx Pipe in added to it to form the Pipe name for the landing table.
Stream Name – this is created based on the landing layer table that you create or choose. A suffix Stream is added to it to form the Stream name for the landing table.
Click Next.
The Datastore is populated based on the options selected.
Provide the following information for Unification Layer Details:
Warehouse - Select a warehouse to store the data.
Unification Layer Details
Database - This is populated based on the selected database.
Target Schema - This is populated based on the selected schema.
Create/Choose Unification Layer Table - Either select a table from the dropdown list or create a new table in the unification layer where the data is stored temporarily.
Task Name - Select the task name.
Specify Schedule Interval (in minutes) - The interval to poll source and load data into the target.
Operation Type: Select the type of operation to be performed on the source data during the job run. Choose one of the following options:
Append - adds new data at the end of the table without erasing the existing content.
Overwrite – replaces the existing data in the table.
Merge – combines the existing and new data in the table. Select a primary key based on which the data merge is done.
Select a storage integration from the dropdown list.
A storage integration is an object created in Snowflake that stores a generated identity and access management (IAM) user for your S3 cloud storage, along with an optional set of allowed or blocked storage locations (i.e. buckets).
Ensure that the storage integration that you select has access to the selected S3 bucket in the source stage.
For information on how to create a storage integration, refer to the following link: Configuring a Snowflake storage integration to access Amazon S3
You can configure the SQS and SNS services to send notifications related to the node in this job. This provides information about various events related to the node without actually connecting to the Calibo Accelerate platform.
| SQS and SNS |
|---|
| Configurations - Select an SQS or SNS configuration that is integrated with the Calibo Accelerate platform. |
Events - Enable the events for which you want to enable notifications:
|
| Event Details - Select the details of the events from the dropdown list, that you want to include in the notifications. |
| Additional Parameters - Provide any additional parameters that are to be added in the SQS and SNS notifications. A sample JSON is provided, you can use this to write logic for processing the events. |
Click Complete.
To run the Stream Ingest data integration job
Publish the pipeline with the changes.
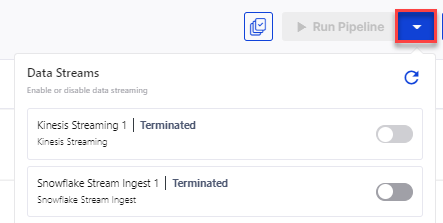
Notice that the Run Pipeline option is disabled. Click the down arrow key adjacent to it. Enable the toggle switch for Snowflake Stream Ingest 1.

The stream ingest job goes into Running state. The status of the Snowflake Integration job is now seen as Running.

To stop running the Stream Ingest data integration job
On the DPS home page, click the down arrow (adjacent to Run Pipeline) and disable the toggle for Snowflake Stream Ingest. The job stops running and the status changes to Terminated.
| What's next? Ingesting Data from Amazon Kinesis Data Streams into an S3 Data Lake |