Data Transformation using dbt Cloud
dbt Cloud is a hosted enterprise-ready platform that simplifies managing and running transformation pipelines, providing visibility and governance around them. The integration of dbt Cloud with source control repositories simplifies version control of dbt code. This makes collaboration between the development team easy while CI/CD automation enables testing the dbt code before pushing it to production.
Calibo Accelerate supports data transformation using dbt Cloud. You can add dbt as a standalone node in the data transformation stage or you can connect it to a data lake and create a pipeline. In the standalone mode of dbt, you can import dbt projects into the platform and run existing jobs or create and run new jobs. If you connect dbt to a data lake and create a pipeline you can create a new job and run it.
Before you create a dbt transformation job, ensure that the dbt Cloud connection details are added to the Calibo Accelerate platform. See Configure dbt Cloud Connection Details
See Configure dbt Cloud Connection Details
Prerequisites
To create or run a data transformation job using dbt Cloud existing connection, you must complete the following prerequisites:
-
Get access to a dbt Cloud configuration listed under Configuration > Cloud Platform Tools & Technologies > Data Integration and Data Transformation.
-
Identify the combination of source and destination that you want to use for the data transformation job using dbt Cloud.
To create a dbt transformation job using a standalone node
-
Sign in to the Calibo Accelerate platform and navigate to Products.
-
Select a product and feature. Click the Develop stage of the feature and navigate to Data Pipeline Studio.
-
Add a data transformation stage and add a dbt Cloud node to the stage.
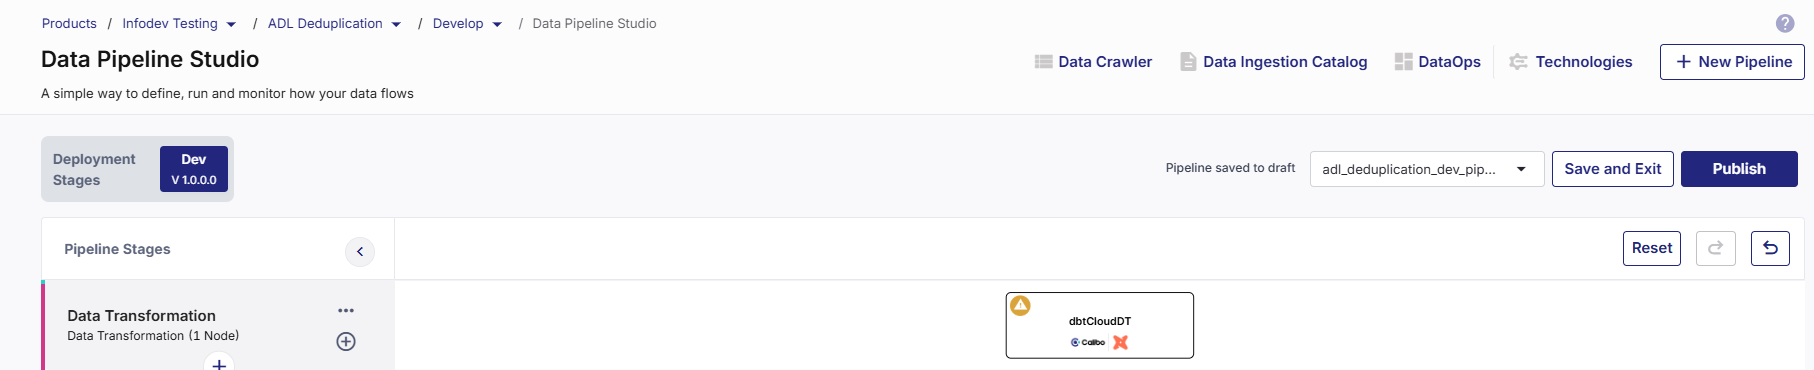
-
Click the dbt Cloud node. You can either run an existing job or create a new one.
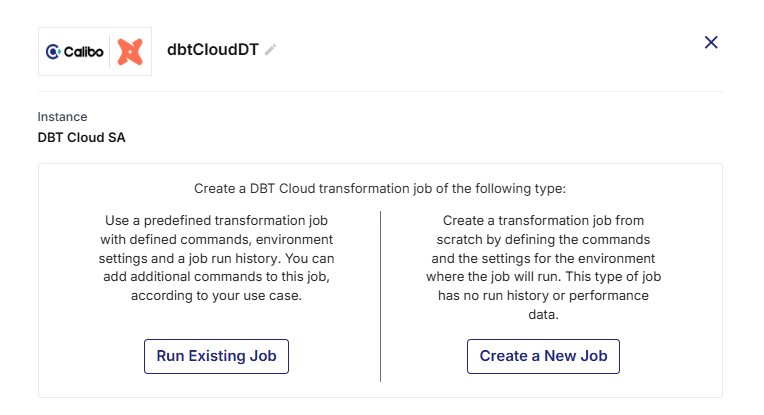
-
To run an existing job, perform step 6. To create a new job, perform step 7.
-
To run an existing job, do the following:
 Job Name
-
Existing Projects - Select the project that contains the job that you want to run.
-
Existing jobs - Select the job that you want to run.
-
Environment - Select the environment in which you want to run the job. This field is auto populated and is non-editable.
-
Node Rerun Attempts - Specify the number of times the pipeline rerun is attempted on this node of the pipeline, in case of failure. The default setting is done at the pipeline level. You can change the rerun attempts by selecting 1, 2, or 3.
Database Connections
The Warehouse Name and the Database Name are auto populated and are non-editable.
Repository Name
The Repository Name associated with the existing job is displayed along with the Repository Path. Both the fields are auto populated and are non-editable.
Execution Settings
In the Commands section, do the following:
-
Run Source Freshness - Enable this setting to ensure that the data in your source tables is refreshed or updated.
-
Click the Delete icon to delete the commands that you want to remove for this job.
-
Rearrange the sequence of commands by dragging the handler and dropping it.
-
+ Add Command - Click this option to add new commands to the existing job.
-
Generate Docs on Run - Enable this option to automatically generate documentation when a command is executed. The documentation includes schema structure, test results, and versioning information.
Advanced Settings
-
Environment Variables - Development - For an existing job this field is auto populated and is non-editable.
-
Target Name - If the logic in your dbt project changes depending on the target name, provide a target name, else you can go with the default value.
-
Run Timeout - This is the maximum number of seconds for which the run will be executed before being canceled. If it is set to 0 (default setting), the job run is canceled after running for 24 hours.
-
dbt Version - The default setting is Latest. Change it as required.
-
Threads - This is the number of parallel threads that dbt can use to run multiple models simultaneously, while running a job.
Click Complete.
-
-
To create a new job, do the following:
Job Name
-
Existing Projects - Select a project to which you want to add the new dbt job.
-
Job Name - Provide a name for the job.
-
Description - Provide a description for the job.
-
Enviroment - Select the environment in which you want to run the job. The environments are created in each dbt project.
-
Environment - Do one of the following:
-
Select the environment in which you want to run the job. The environments are created in each dbt project.
-
Click + New Environment - Provide the inputs required to create a new environment.
Environment Name Provide a name for the environment. Environment Type Deployment. This is the default selection and is non-editable. dbt Version by default, Latest is selected. You can choose another option from:
-
Inherited
-
Compatible
-
Extended
Connection from dbt Select a dbt connection from the dropdown list. Schema Name Provide a schema name associated with the dbt connection. View Connection Details These details include:
-
account
-
database
-
warehouse
-
client_session_keep_alive
-
role
Auth Method The authentication method currently supported is Username, Password. Username Provide the username for dbt.
Password Provide the password for dbt. Test Connection Click to test the dbt connection. Extended Attributes Additional settings or parameters allowing dbt jobs to behave in specific ways depending on the warehouse or project setup. The parameters can include:
-
Role (e.g., DEV_ROLE, ANALYST_ROLE)
-
Warehouse size and auto-suspend/resume behavior
-
Thread/concurrency settings
-
Custom schemas or databases for different targets
-
-
-
Node Rerun Attempts - Specify the number of times the pipeline rerun is attempted on this node of the pipeline, in case of failure. The default setting is done at the pipeline level. You can change the rerun attempts by selecting 1, 2, or 3.
Database Connections
-
Warehouse Name - This field is auto populated and is non-editable.
-
Database Name - This field is auto populated and is non-editable.
Repository Name
The Repository Name associated with the selected project is displayed along with the Repository Path. Both the fields are auto populated and are non-editable.
Execution Settings
In the Commands section, do the following:
-
Run Source Freshness - Enabling this setting ensures that the data in your source tables is refreshed or updated.
-
+ Add Command - Click this option to add new commands to the existing job.
-
Generate Docs on Run - Enable this option to automatically generate documentation when a command is executed. The documentation includes schema structure, test results, and versioning information.
Advanced Settings
-
Target Name - Change the target to a value other than default, if the logic changes for a selected target.
-
Run Timeout - Maximum number of seconds for which the run will be executed before being canceled. If it is set to 0 (default setting), the job run is concealed after running for 24 hours.
-
dbt Version - The default setting is Latest. Change it to one of the following as per your requirement.
-
Inherited
-
Compatible
-
Extended
-
-
Threads - This is the number of parallel threads that dbt can use to run multiple models simultaneously, while running a job.
Click Complete.
-
-
To run the dbt job, do one of the following:
-
Publish the pipeline. Click Run Pipeline on the home page of DPS.
-
Publish the pipeline. Click the dbt node and click Start in the side drawer.
To create a pipeline using dbt transformation node
-
Sign in to the Calibo Accelerate platform and navigate to Products.
-
Select a product and feature. Click the Develop stage of the feature and navigate to Data Pipeline Studio.
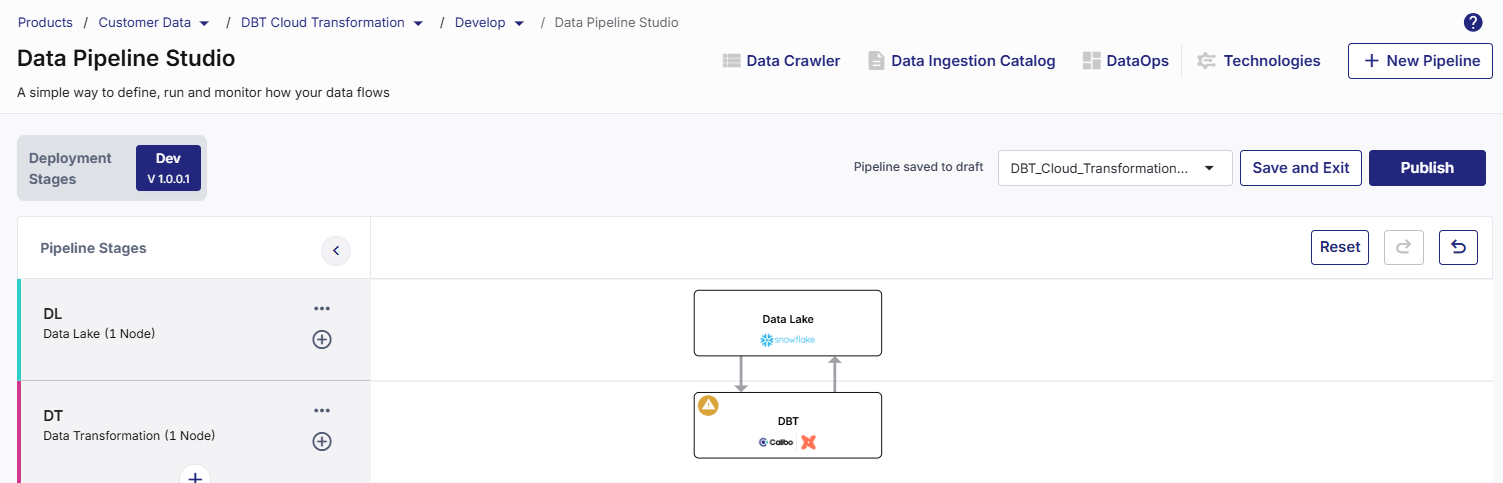
-
Add a data transformation stage and add a dbt Cloud node to the stage. Add a data lake stage and add a Snowflake node to the stage. Connect the nodes to and from each other like a typical data transformation pipeline.
-
Click the dbt Cloud node and click Create a New Job.

-
Provide the following information:
Job Name
-
Existing Projects - Select a project to which you want to add the new dbt job.
-
Job Name - Provide a name for the job.
-
Description - Provide a description for the job.
-
Environment - Do the following:
Click + New Environment - Provide the inputs required to create a new environment.
Environment Name Provide a name for the environment. Environment Type Deployment. This is the default selection and is non-editable. dbt Version by default, Latest is selected. You can choose another option from:
-
Inherited
-
Compatible
-
Extended
Connection from dbt Select a dbt connection from the dropdown list. Schema Name Provide a schema name associated with the dbt connection. View Connection Details These details include:
-
account
-
database
-
warehouse
-
client_session_keep_alive
-
role
Auth Method The authentication method currently supported is Username, Password. Username Provide the username for dbt.
Password Provide the password for dbt. Test Connection Click to test the dbt connection. Extended Attributes Additional settings or parameters allowing dbt jobs to behave in specific ways depending on the warehouse or project setup. The parameters can include:
-
Role (e.g., DEV_ROLE, ANALYST_ROLE)
-
Warehouse size and auto-suspend/resume behavior
-
Thread/concurrency settings
-
Custom schemas or databases for different targets
-
-
Node Rerun Attempts - Specify the number of times the pipeline rerun is attempted on this node of the pipeline, in case of failure. The default setting is done at the pipeline level. You can change the rerun attempts by selecting 1, 2, or 3.
-
Fault Tolerance - Select the behaviour of the pipeline upon failure of a node. The options are:
-
Default - Subsequent nodes should be placed in a pending state, and the overall pipeline should show a failed status. This is the default setting.
-
Skip on Failure - The descendant nodes should stop and skip execution.
-
Proceed on Failure - The descendant nodes should continue their normal operation on failure.
-
Database Connections
-
Warehouse Name - This field is auto populated and is non-editable.
-
Database Name - This field is auto populated and is non-editable.
Repository Name
The Repository Name associated with the selected project is displayed along with the Repository Path. Both the fields are auto populated and are non-editable.
Execution Settings
In the Commands section, do the following:
-
Run Source Freshness - Enabling this setting ensures that the data in your source tables is refreshed or updated.
-
+ Add Command - Click this option to add new commands to the existing job.
-
Generate Docs on Run - Enable this option to automatically generate documentation when a command is executed. The documentation includes schema structure, test results, and versioning information.
Advanced Settings
-
Target Name - Change the target to a value other than default, if the logic changes for a selected target.
-
Run Timeout - Maximum number of seconds for which the run will be executed before being canceled. If it is set to 0 (default setting), the job run is concealed after running for 24 hours.
-
dbt Version - The default setting is Latest. Change it to one of the following as per your requirement.
-
Inherited
-
Compatible
-
Extended
-
-
Threads - This is the number of parallel threads that dbt can use to run multiple models simultaneously, while running a job.
Click Complete.
Notifications
You can configure the SQS and SNS services to send notifications related to the node in this job. This provides information about various events related to the node without connecting to the Calibo Accelerate platform.
SQS and SNS Configurations - Select an SQS or SNS configuration that is integrated with the Calibo Accelerate platform. Events - Enable the events for which you want to enable notifications:
-
Select All
-
Node Execution Failed
-
Node Execution Succeeded
-
Node Execution Running
-
Node Execution Rejected
Event Details - Select the details of the events from the dropdown list, that you want to include in the notifications. Additional Parameters - Provide any additional parameters that are to be added in the SQS and SNS notifications. A sample JSON is provided, you can use this to write logic for processing the events. -
-
To view the implicit connections, do the following:
-
On the dbt Cloud node, click the expand icon to show the implicit node. The Target node is automatically displayed with the dotted line connectors.
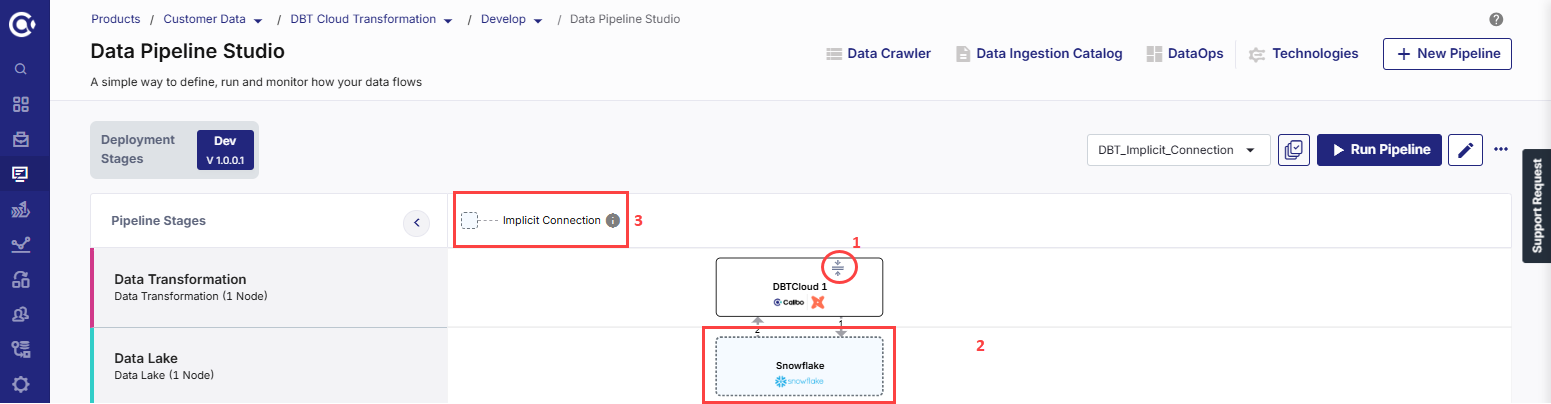
-
In the pipeline, click the implicit target node. The configuration opens in read-only mode and cannot be edited.
-
-
To run the dbt job, do one of the following:
Click Complete.
The dbt Cloud node is successfully configured, and the supported target node is automatically added to the pipeline as implicit node. See Implicit Nodes.
Note:
You cannot create manual connections to/from an implicit node, and you cannot delete the implicit node or the stage that contains the implicit node.
Implicit Nodes
The supported target node that is automatically added to a dbt Cloud transformation node is called implicit node. The connections to the implicit node (Implicit target node to dbt Cloud, then dbt Cloud to implicit target node) are displayed as dotted lines.
Explicit Nodes
The dbt Cloud node in a data transformation pipeline is an explicit node. Unlike other data transformation nodes this node cannot be connected to any other data lake apart from its implicit data lake node.
| What's next? Snowflake Custom Transformation Job |