Edit Your Azure Active Directory SSO Settings
You can update your existing Azure Active Directory SSO configuration (for example, to rotate credentials such as Tenant ID or Client Secret) using the following steps:
Note:
Only platform administrators or users with appropriate permissions can edit SSO settings.
Prerequisites
Before editing your Azure Active Directory (Azure AD) SSO configuration in Calibo Accelerate, ensure the following prerequisites are met:
-
Application is already registered in Azure AD
The Calibo Accelerate platform must already be registered as an application in your Azure AD tenant. This existing registration is necessary to update SSO settings such as Tenant ID, Client ID, Client Secret, or redirect URIs.
-
Tenant ID, Client ID, and Client Secret are available
You may need to update the credentials for the registered application. Make sure you have access to:
-
Tenant ID: A unique identifier for your Azure AD directory (tenant). This value is needed to establish a connection between Calibo Accelerate and your Azure AD instance.
-
Client ID: Also known as the application ID, this is generated when you register your application in Azure AD. It uniquely identifies the registered application.
-
Client Secret: This is a secret key generated in Azure AD that acts like a password for the application. It’s required to authenticate Calibo Accelerate during the SSO process. If you are rotating the secret, generate a new one in Azure AD before editing the configuration in Calibo Accelerate.
-
-
Mandatory API permissions are already granted:
Ensure the following API permissions are still correctly assigned to the registered app:
-
User.Read (Default): This permission allows Calibo Accelerate to read the basic profile information of the signed-in user (such as name and email).
-
User.Read.All (Type – Application): This permission is required for Calibo Accelerate to read the profiles of all users within the Azure AD directory. It is essential for managing user access and importing users into the Calibo Accelerate platform.
-
Steps to Edit SSO Settings
To edit your Azure Active Directory SSO configuration in Calibo Accelerate, do the following:
-
Go to Platform Setup > Security & SSO.
-
In the Configured Identity Provider section, you will see your existing Azure AD SSO configuration. Click the ellipsis (⋯) and select Edit.

-
The following confirmation message appears. Click Proceed to continue.

-
On the Edit Single Sign-on screen, your existing Azure AD SSO configuration is displayed. You can either review or edit the values as mentioned in the following table:
Field Description Configured Domain Auto-populated with the domain used in your previous configuration and the Azure AD application. This field is read-only to preserve user identity mapping integrity. Confirmation Checkbox Select the box to confirm that you are using the same domain as earlier. Tenant ID You can update this field if your directory ID has changed. Client ID Update this if a new app registration was created. Client Secret Enter a new secret if the current one is expiring or has been rotated. -
Click Test Connection to verify that the updated values can successfully establish a connection to Azure AD.
-
After the successful test connection, click Next.
-
If the test fails, review your entries for accuracy.
Click Previous to return to the previous screen.
Click Cancel and then, in the confirmation message, click Yes to discard your unsaved identity provider configuration changes and go back to the previous screen.
-
-
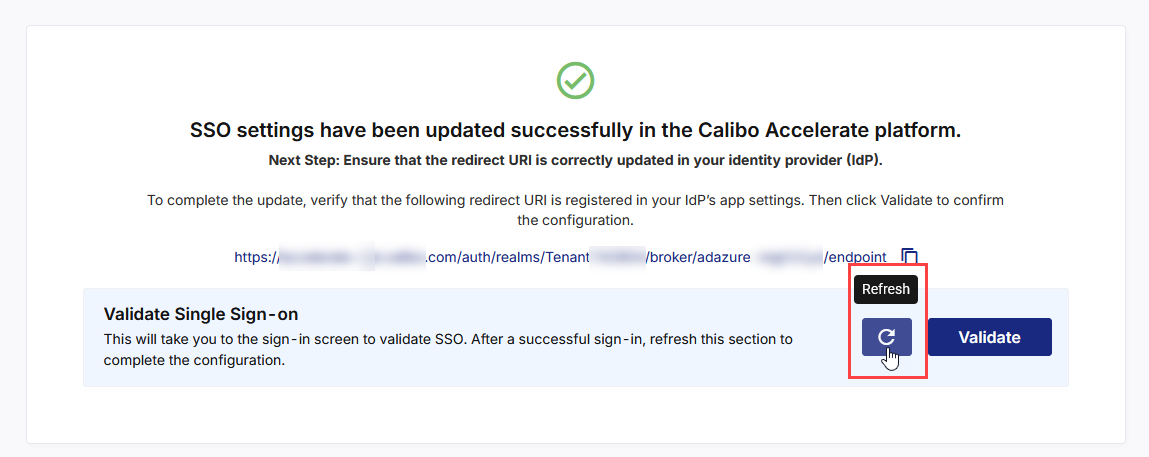
At this stage, the SSO configuration updates in the Calibo Accelerate platform interface are complete and a redirect URI is available. Copy this URI and add it to the registered application in Azure Active Directory. It is the Calibo Accelerate URL where Azure Active Directory must send authentication responses after successfully verifying a user’s identity.

-
After you add the redirect URI to your registered app in Azure AD, come back to the Calibo Accelerate screen from where you copied the redirect URI, and in the Validate Single Sign-on section, click Validate.

-
This takes you to the Calibo Accelerate sign-in screen. Use your SSO credentials for user authentication. After a successful authentication redirection and SSO validation, the following success message is displayed.

-
Return to the SSO configuration screen and click the Refresh icon to complete your SSO configuration.
-
After you see the message confirming that your SSO validation is successful, click Finish to complete the configuration updates.


After you click Finish, your current session will automatically end. You will be logged out of the platform and will need to sign in again using your valid SSO credentials.